Features Template
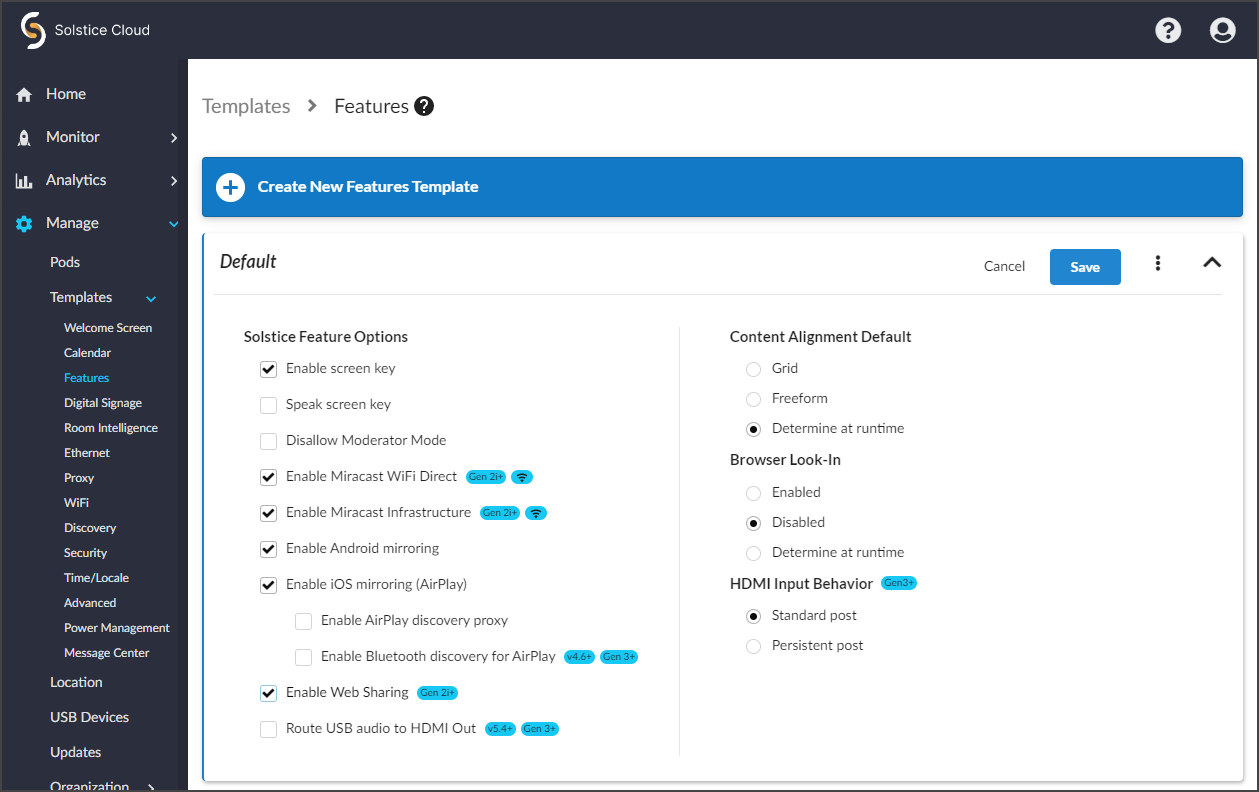
The Features template allows you to configure options for how attendees view and interact with the Solstice display. It includes options that determine how attendees can connect to the meeting, as well as how they view and share content on their personal devices. Miracast and AirPlay support can also be enabled. For more information on how to configure Solstice to support sharing with AirPlay and Miracast, see Enable Sharing with AirPlay and Enable Sharing with Miracast.

How To
From the Solstice Cloud Home page, in the left sidebar navigation panel, click Manage > Templates > Features.
Click Create New Features Template.
Enter the Template Name. For example, name the template by location (London Office) or descriptively (Mountain Theme).
After you are done creating and customizing your template, click Save in the top right corner of the template. After a template is saved, it can be assigned to Pods. Templates can be edited or deleted at any time.
Tip
You can also start by duplicating an existing template and making changes to it. Click on the three dots on the right side of the template you want to start with, and choose Duplicate Template.
When enabled, this option requires in-room users to enter the randomly generated screen key on the Solstice display before they can connect. An accessibility option to speak the screen key can also be selected.
In the Solstice Feature Options section, select Enable screen key.
If desired, select the Speak screen key option read the screen key aloud when a user attempts to connect to the display. If multiple connection attempts occur in short succession, the screen key is spoken a maximum of one time every 10 seconds.
Click Save.
Moderator Mode allows you to approve or deny requests from users to join the session or post content to the display. Moderator Mode is enabled by default.
To disable Moderator Mode, select Disallow Moderator Mode.
Click Save.
Users can mirror their Windows device screens to a Solstice Pods via Miracast in two ways: either over the existing network infrastructure the Pod is connected to, or directly to the Pod via a wireless P2P stream.
To enable Miracast mirroring, apply the appropriate settings for your Pods' network configuration based on the table below.
Network Configuration
Miracast Configuration in Solstice Cloud
Ethernet Only (recommended)
Select both Enable Miracast Infrastructure and Enable Miracast WiFi Direct.
Note
WiFi must also be enabled on Pods for Miracast discovery. In the WiFi configuration, select Enable WiFi, choose Existing Network, set Security Type to Open, and leave SSID blank. (The wireless interface will only be used for Miracast discovery.)
Warning
Turning off Miracast WiFi Direct and then back on in quick succession for a Solstice Pod may result in it temporarily appearing multiple times in the Windows Connect and Wi-Fi connection panels. To resolve this issue, refresh the list of available Miracast WFD devices by turning Wi-Fi off and back on for affected Windows devices.
Wirelessly Attached to Existing Network Only
Select Enable Miracast Infrastructure.
Ethernet + Wirelessly Attached to Existing Network
Select Enable Miracast Infrastructure.
Ethernet + Wireless Access Point
Miracast not supported. When the Pod is acting as an access point, Miracast discovery cannot operate. Contact Mersive to discuss other options like attaching your Pod to an existing network.
Wireless Access Point Only
Click Save.
Note
For more about Miracast and configuring it for your organization's needs, see Enable Sharing with Miracast.
Android mirroring allows screen mirroring from an Android mobile device to the Pod display.
Note
Some Android apps may block audio capture, preventing the streaming of their audio to Solstice.
Select Enable Android mirroring.
Click Save.
There are a number of available options for allowing iOS users to mirror their device screens to a Pod display, depending on your network configuration and preferences.
To allow users to mirror their iOS device screen to the Pod, select Enable iOS mirroring (AirPlay).
Select the Enable AirPlay discovery proxy option if your network does not allow use of Apple's Bonjour.
Select the Enable Bluetooth discovery for AirPlay option to allow end-users to discover the Solstice display without having to first connect to the network.
Note
This option provides another alternative for discovery in environments that do not allow UDP broadcast traffic or Apple's Bonjour protocol. Available starting on Solstice 4.6 and Gen3 Pods. Users must still connect to the same network as the Pod to stream content via AirPlay.
Click Save.
Note
For more information on how to configure AirPlay, see Enable Sharing with AirPlay.
Enabling this option allows users to connect to a Solstice display and share content without installing the Mersive Solstice app by using a web browser, either using http://[Solstice URL]:6443 (Solstice 5.5.2 and earlier) or with the redesigned Solstice web app at share.mersive.com.
The Solstice web app is supported on Solstice Pods running Solstice 6 and later. It is secured with a new default SSL certificate. Upgrading a Solstice Pod to Solstice 6+ replaces the old Mersive default certificate, but does not overwrite customer-installed certificates.
Select Enable Web Sharing. (Available on Gen2i and Gen3 Pods.)
Click Save.
When a USB device with audio output, such as a composite camera, is connected to a Gen3 Solstice Pod, audio output for the Pod is routed through the USB port to the USB device by default. However, starting in Solstice 5.4 you can choose for audio to instead be routed to the HDMI output, or HDMI outputs if the Pod is connected to more than one display monitor.
Check Route audio to HDMI Out to redirect USB audio to the HDMI Output(s).
Click Save.
These settings determine how content shared to Solstice is aligned on the display.
Select one of the following options:
Grid: The content alignment is set to grid mode, which automatically aligns content into a grid-like pattern. End-users can not change the alignment.
Freeform: The content alignment is set to free-form mode, which allows content to be moved around without being restricted to a grid. End-users can not change this setting.
Determine at runtime (recommended): Allows end-users to set the preferred content alignment mode when they use the Solstice app.
Click Save.
These options are used to specify whether end-users can view collaboration sessions remotely using a web browser.
Select one of the following options:
Enabled: End-users can view collaboration sessions remotely using a web browser by entering the IP address on the Solstice display.
Disabled: End-users can not view collaboration sessions remotely.
Determine at runtime: When a collaboration session begins, end-users can decide if the collaboration session may be viewed remotely.
Note
If the security of your collaboration sessions is a concern, Mersive recommends selecting Disabled.
Click Save.
You can set the default behavior for a wired source connected to the HDMI-in port of a Solstice Gen3 Pod. This is useful if you want to use a persistent wired input source such as a dedicated in-room computer, an integrated video room system device, or a digital signage media player between collaboration sessions.
Select one of the following options HDMI input behavior mode options:
Standard Post (default): If a wired HDMI-in source is connected to the Solstice Pod, it is treated as a standard Solstice content post. For example, choose this if guest users often use the HDMI-in port to connect to the Solstice sharing space without network access.
Persistent Post: A wired HDMI-in source persistently connected to the Solstice Pod, appears full screen while there are no other posts shared to Solstice. When another post is shared, the wired HDMI-in source is automatically moved off screen to the dock. When all wireless posts are deleted, the wired HDMI-in source automatically returns to full screen. This mode is designed to support wired inputs that should appear anytime users are not actively sharing content to Solstice.
Note
In Persistent Post mode, the post from the HDMI-in port is docked during wireless sharing but cannot be deleted. To remove the post, unplug the wired HDMI-in source.
Click Save.
Note
Want to enable Solstice video conference connections or occupancy data? See the Room Intelligence Template.
Note
Solstice administrators should be aware that the Cloud settings for a Solstice Pod take precedence and overwrite any conflicting settings on the Pod itself.
In the case of a settings mismatch for a Pod between Solstice Cloud and the Pod's own settings, Cloud settings always "win." The only exception is when a settings change in a Cloud template causes Solstice Cloud to be unable to connect to the Pod. In this case, the settings in that template set are rolled back to the last working configuration for that Pod. Pod and template status indicators alert users when this case occurs.
In the left sidebar menu of Solstice Cloud, click Manage > Pods.
The Pod Template Assignments table displays. This table is used to apply templates across your deployment. You can apply a template to multiple Pods at once.
Tip
Filter Solstice Pods in your deployment by default categories or categories you have created to apply templates efficiently to similar Pods. Filters allow you to apply templates by criteria such as location or campus, depending on the categories you have created and assigned to Pods.
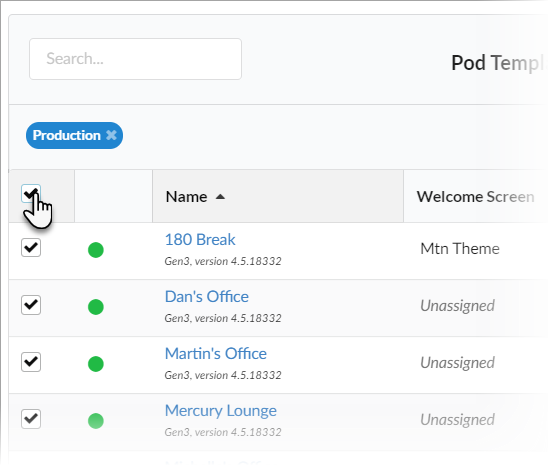
Select the Pods you want to apply the template to. You can select each Pod's checkbox individually, or select the checkbox in the header row of the table to select all Pods showing in the table.

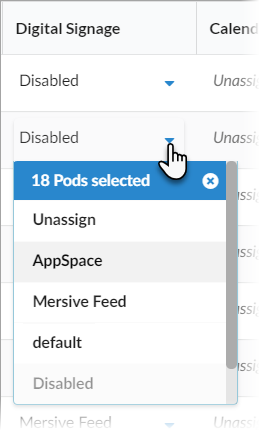
For each template you want to apply, go to the corresponding template type column (e.g., Welcome Screen). You can view different groups of templates by selecting a template category in the upper right corner of the table.

Select the template with the desired configuration from the list in the appropriate column for one of the selected Pods. This applies the template to all the selected Pods in the table.

Click Confirm when to confirm applying the selected template to all selected Pods.
As changes are being applied, the pending changes
 icon appears next to the template(s) being applied. After the changes are applied, the Pod's normal status resumes.
If a Pod is offline, any changes made are applied when the Pod comes back online.
If a settings change in a Cloud template causes Solstice Cloud to be unable to connect to the Pod, the Pod's settings for that template is rolled back to their previous configuration. A failure icon
 shows that the template could not be applied.
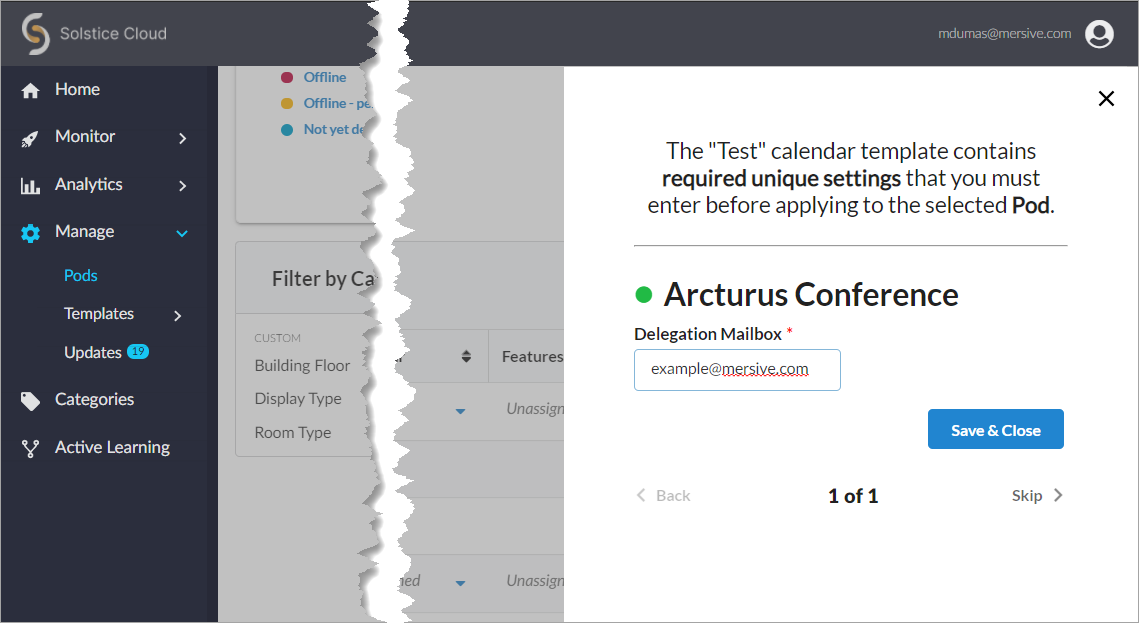
If a template you applied has any unique-to-Pod settings that need to be applied each Pod individually, a pop-up pane appears prompting you to enter the needed information for each affected Pod. After you complete all of the settings screens, click Save & Close.

Tip
Solstice checks the settings selected for a Pod in Solstice Cloud management against the settings on the Pod itself approximately once an hour, as well as upon Pod reboot.