Security Template
A Solstice Pod is a network-attached device that provides straightforward and secure wireless access to existing display infrastructure by leveraging a host IT network. By configuring your Pods according to these guidelines, users can quickly connect and share content to the displays in Pod-enabled rooms while still maintaining network security standards. Pods that are not configured properly can be vulnerable to user and network security breaches, including unauthorized user access, screen capture and recording, unauthorized changes to configuration settings, and denial-of-service attacks.

How To
From the Solstice Cloud Home page, in the left sidebar navigation panel, click Manage > Templates > Security.
Click Create New Security Template.
Enter the Template Name. For example, you could name the template by location (London Office) or descriptively (High Security).
Click Save.
Tip
You can also start by duplicating an existing template and making changes to it. Click on the three dots on the right side of the template you want to start with, and choose Duplicate Template.
To protect Pod configurations, you can set an admin password that is required to make configuration changes. After an admin password is set, you are required to enter the password to change configuration settings. This password is also required to retrieve usage logs from your Pod or to perform a factory reset.
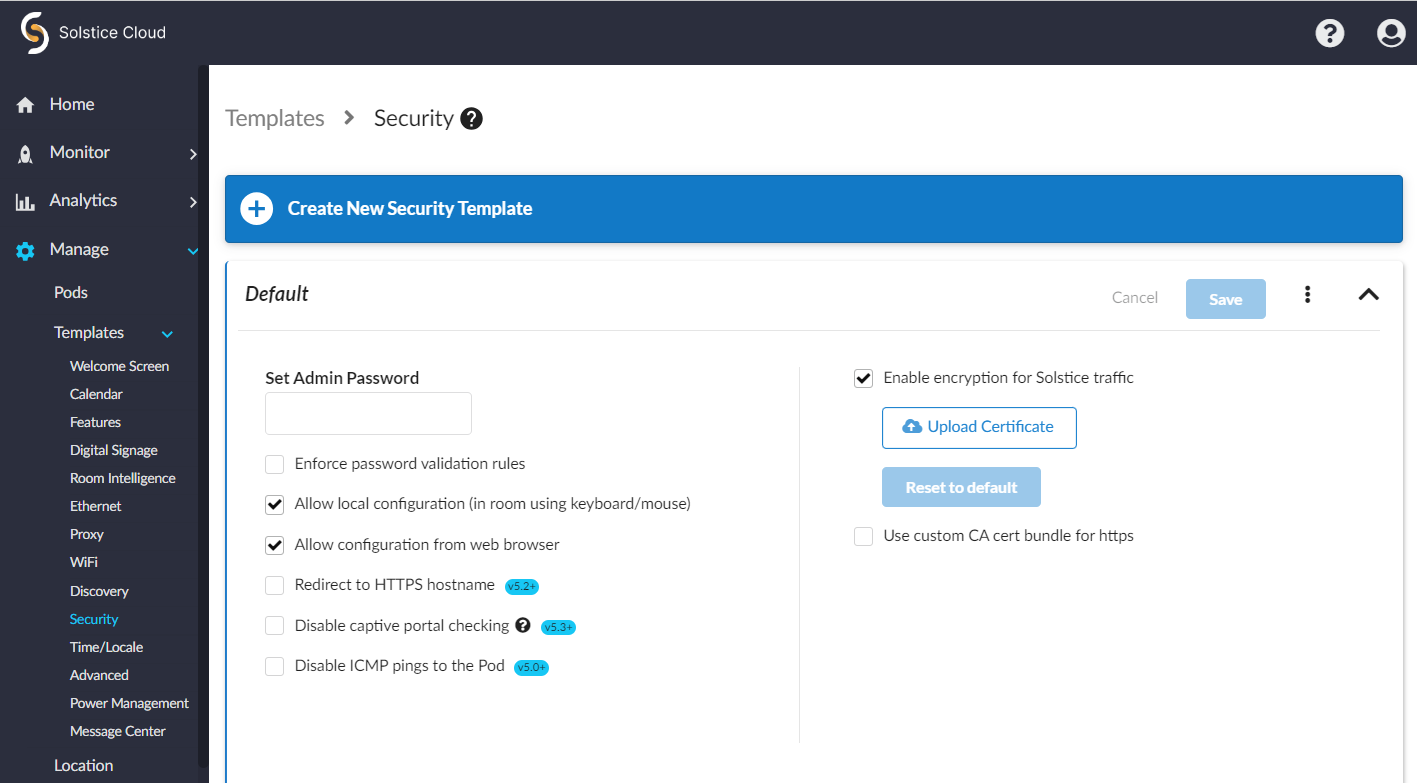
In the Admin Password field, enter in the password to use to change the Solstice display's configuration, or remove the password entirely.
Mersive highly recommends that you set the same administrator password for all of your Pods.
To enforce password validation rules (8-character minimum, one uppercase and one lowercase character, one number or special character), select the Enforce password validation rules option.
Click Save.
If you have chosen not to set an admin password to protect Pod configurations, you can still prevent users from making changes by disabling local configuration (in-room using a keyboard or mouse) or from a web browser. However, disabling both of these options means that you can only configure the Pod using Solstice Cloud, which requires network connectivity.
To enable in-room configuration, select the Allow local configuration checkbox. To disable it, uncheck this box.
To enable configuration from a web browser, select the Allow configuration from web browser checkbox. To disable it, uncheck this box.
Click Save.
Solstice admins have the option to enable Solstice to redirect a user who enters the HTTP version of the Solstice host’s IP address or DNS hostname (e.g. http://111.22.3.44) to the secure HTTPS DNS hostname (e.g. https://hostname.domain) when the Pod’s certificate is validated by the web browser. This ensures that internal users have a secure connection to the Solstice QuickConnect page. This feature is available starting in Solstice 5.1.
Select the Redirect to HTTPS hostname checkbox to enable this functionality.
Click Save.
Note
This feature requires that Solstice admins enter a valid DNS hostname in the Pod’s network settings and have a valid client-to-server certificate on the Pod. To enter a Pod's DNS Hostname, go to Manage > Pods, click on the Pod's name, and update the Ethernet and/or Wifi sections (depending on your network configurations). Be sure to Save your changes in each section.
Notice
Solstice versions 6.1 and later no longer perform captive portal checks. The directions below detail how to disable this functionality in earlier versions.
Periodically, each Pod checks to see if it has access to the internet. However, if you want to eliminate this network traffic, you can disable these checks. This option is available starting in Solstice 5.3.
To disable these checks, select the Disable Captive Portal Checking checkbox.
Click Save.
Tip
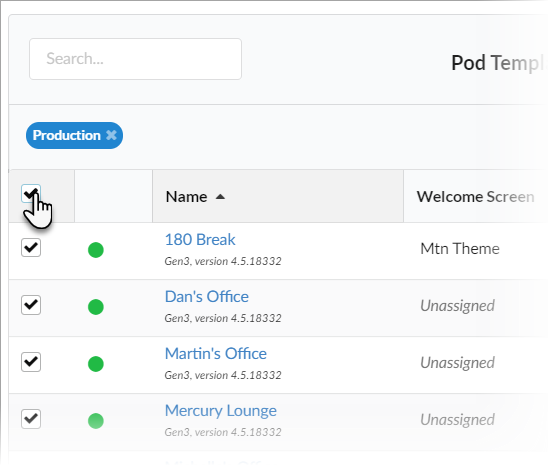
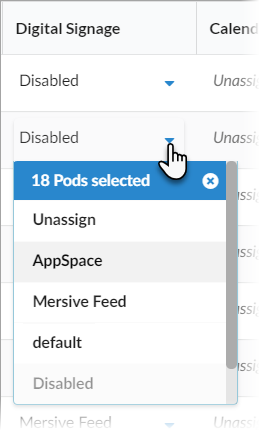
To apply this setting to all your Pods at once, go to Manage > Pods and select the checkbox at the top of the first column. This checks all the Solstice Pods available to you in the list. Click Settings to show the Security column and select the Security template with captive portal checking disabled for any one of the selected Pods. You are prompted to confirm the change on the number of selected Pods.
Disables the ability to ping Pods over the wireless access point (WAP), wireless, or Ethernet networks and prevents ICMP/Ping flooding that could lock up the Pod. This feature is disabled by default.
To disable the ability to ping Solstice Pods, check Disable ICMP pings to the Pod.
Click Save.
This setting allows for the encryption of Solstice network traffic between the Pod and user devices using a standard RSA/SHA cipher with a 2048-bit private key. This also includes network traffic related to configuration via either the Solstice Dashboard or the Pod’s web-based configuration (if enabled). When this option is enabled, the Solstice Dashboard also sends SLR updates via port 443.
By default, the Pod is loaded with a self-signed TLS certificate that is used when the Pod receives TLS connections. However, there is an option to upload a custom TLS certificate to be used instead. When this encryption option is disabled, the Pod still uses the TLS certificate for HTTPS traffic. For more information about certificate management in Solstice, see Enterprise Certificate Management.
Note
An issue existed in Solstice 5.5 and 5.5.1 where loading a custom PFX (.p12) certificate to encrypt Solstice client/server traffic caused a fatal boot loop. Installing a custom .p12 certificate should be avoided for Solstice Pods running these versions of Solstice. (PEM certificates can still be used.) Mersive resolved this issue in Solstice 5.5.2.
To turn on network encryption, select the Enable encryption for Solstice traffic checkbox.
To upload a custom TLS certificate to be used instead of the Pod's default self-signed certificate, click the Upload Certificate button, then browse to and select the certificate file.
Click Save.
This option allows you to load a self-signed CA certificate bundle onto one or more Pods to be used for HTTPS communications and to validate the Pod’s access to external data connections such as digital signage feeds, RSS feeds, and Solstice Cloud. This is especially important for networks that use a MITM proxy that intercepts HTTPS requests. The custom CA bundle is used in addition to the Pod’s built-in CA certificates, which are suitable for most internet access.
Note
Solstice supports PFX and PEM certificate formats. Note that only PEM certificates with the .crt file extension are supported.
Select the Use custom CA cert bundle for HTTPS checkbox.
Click Upload custom CA cert bundle.
In the file explorer that opens, browse and select the CA certificate bundle, then click Open.
Click Save.
Note
Solstice administrators should be aware that the Cloud settings for a Solstice Pod take precedence and overwrite any conflicting settings on the Pod itself.
In the case of a settings mismatch for a Pod between Solstice Cloud and the Pod's own settings, Cloud settings always "win." The only exception is when a settings change in a Cloud template causes Solstice Cloud to be unable to connect to the Pod. In this case, the settings in that template set are rolled back to the last working configuration for that Pod. Pod and template status indicators alert users when this case occurs.
In the left sidebar menu of Solstice Cloud, click Manage > Pods.
The Pod Template Assignments table displays. This table is used to apply templates across your deployment. You can apply a template to multiple Pods at once.
Tip
Filter Solstice Pods in your deployment by default categories or categories you have created to apply templates efficiently to similar Pods. Filters allow you to apply templates by criteria such as location or campus, depending on the categories you have created and assigned to Pods.
Select the Pods you want to apply the template to. You can select each Pod's checkbox individually, or select the checkbox in the header row of the table to select all Pods showing in the table.

For each template you want to apply, go to the corresponding template type column (e.g., Welcome Screen). You can view different groups of templates by selecting a template category in the upper right corner of the table.

Select the template with the desired configuration from the list in the appropriate column for one of the selected Pods. This applies the template to all the selected Pods in the table.

Click Confirm when to confirm applying the selected template to all selected Pods.
As changes are being applied, the pending changes
 icon appears next to the template(s) being applied. After the changes are applied, the Pod's normal status resumes.
If a Pod is offline, any changes made are applied when the Pod comes back online.
If a settings change in a Cloud template causes Solstice Cloud to be unable to connect to the Pod, the Pod's settings for that template is rolled back to their previous configuration. A failure icon
 shows that the template could not be applied.
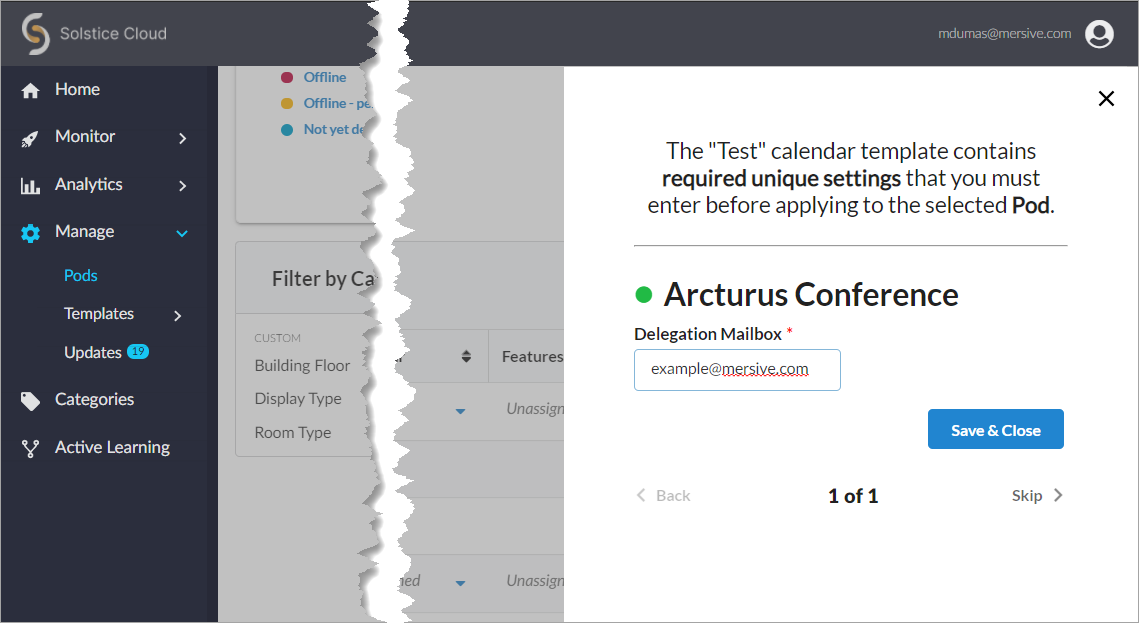
If a template you applied has any unique-to-Pod settings that need to be applied each Pod individually, a pop-up pane appears prompting you to enter the needed information for each affected Pod. After you complete all of the settings screens, click Save & Close.

Tip
Solstice checks the settings selected for a Pod in Solstice Cloud management against the settings on the Pod itself approximately once an hour, as well as upon Pod reboot.