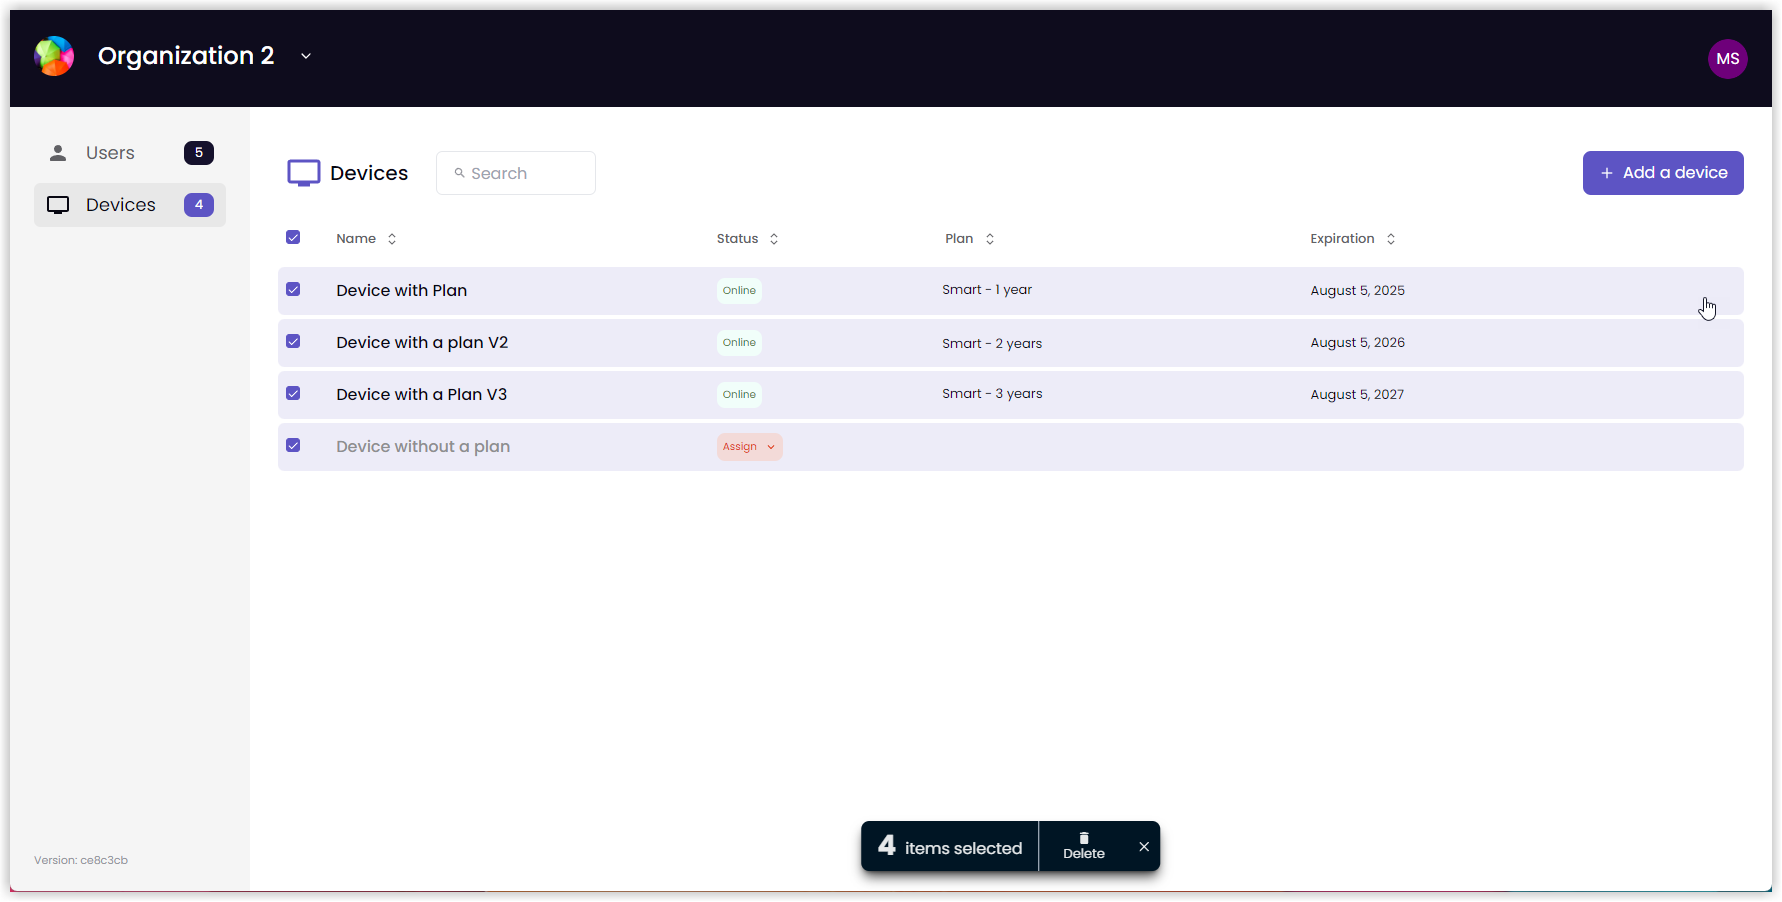
Managing Devices

The Devices list within the Mersive Management Console allows you to view the list of devices attached to an organization, add or delete devices, check device status, and customize the look-and-feel of your devices. The Devices list displays the devices associated with the organization you logged into. So, if you have multiple organizations, you will need to switch between them to see all the devices attached to your account.

Device status is shown in the Status column. Common statuses and their meaning:

  • Online: the device is responding to the admin portal.

  • Offline: the device is not responding to the admin portal.

  • Assign: the device does not have a plan assigned to it.

If you have are having problems managing an offline device, see Troubleshooting Offline Devices more information.

How to Add a Device to an Organization

This procedure explains how to use the admin portal to add a device. You can also add a device using the Activation procedure, which can be done from a laptop or a mobile device. Adding a device from the admin portal will add it to the organization you’re currently logged into, so be sure to log into the correct organization before starting this procedure.

To add a device to your organization using the admin portal, take the following steps:

  1. Startup the device being added to your organization and wait until the activation screen displays.

    Activation_01.png
  2. On your laptop, open a web browser and go to app.mersive.com/admin.

  3. Select your Organization. The list of devices attached to this organization appears.

    Org_01.png
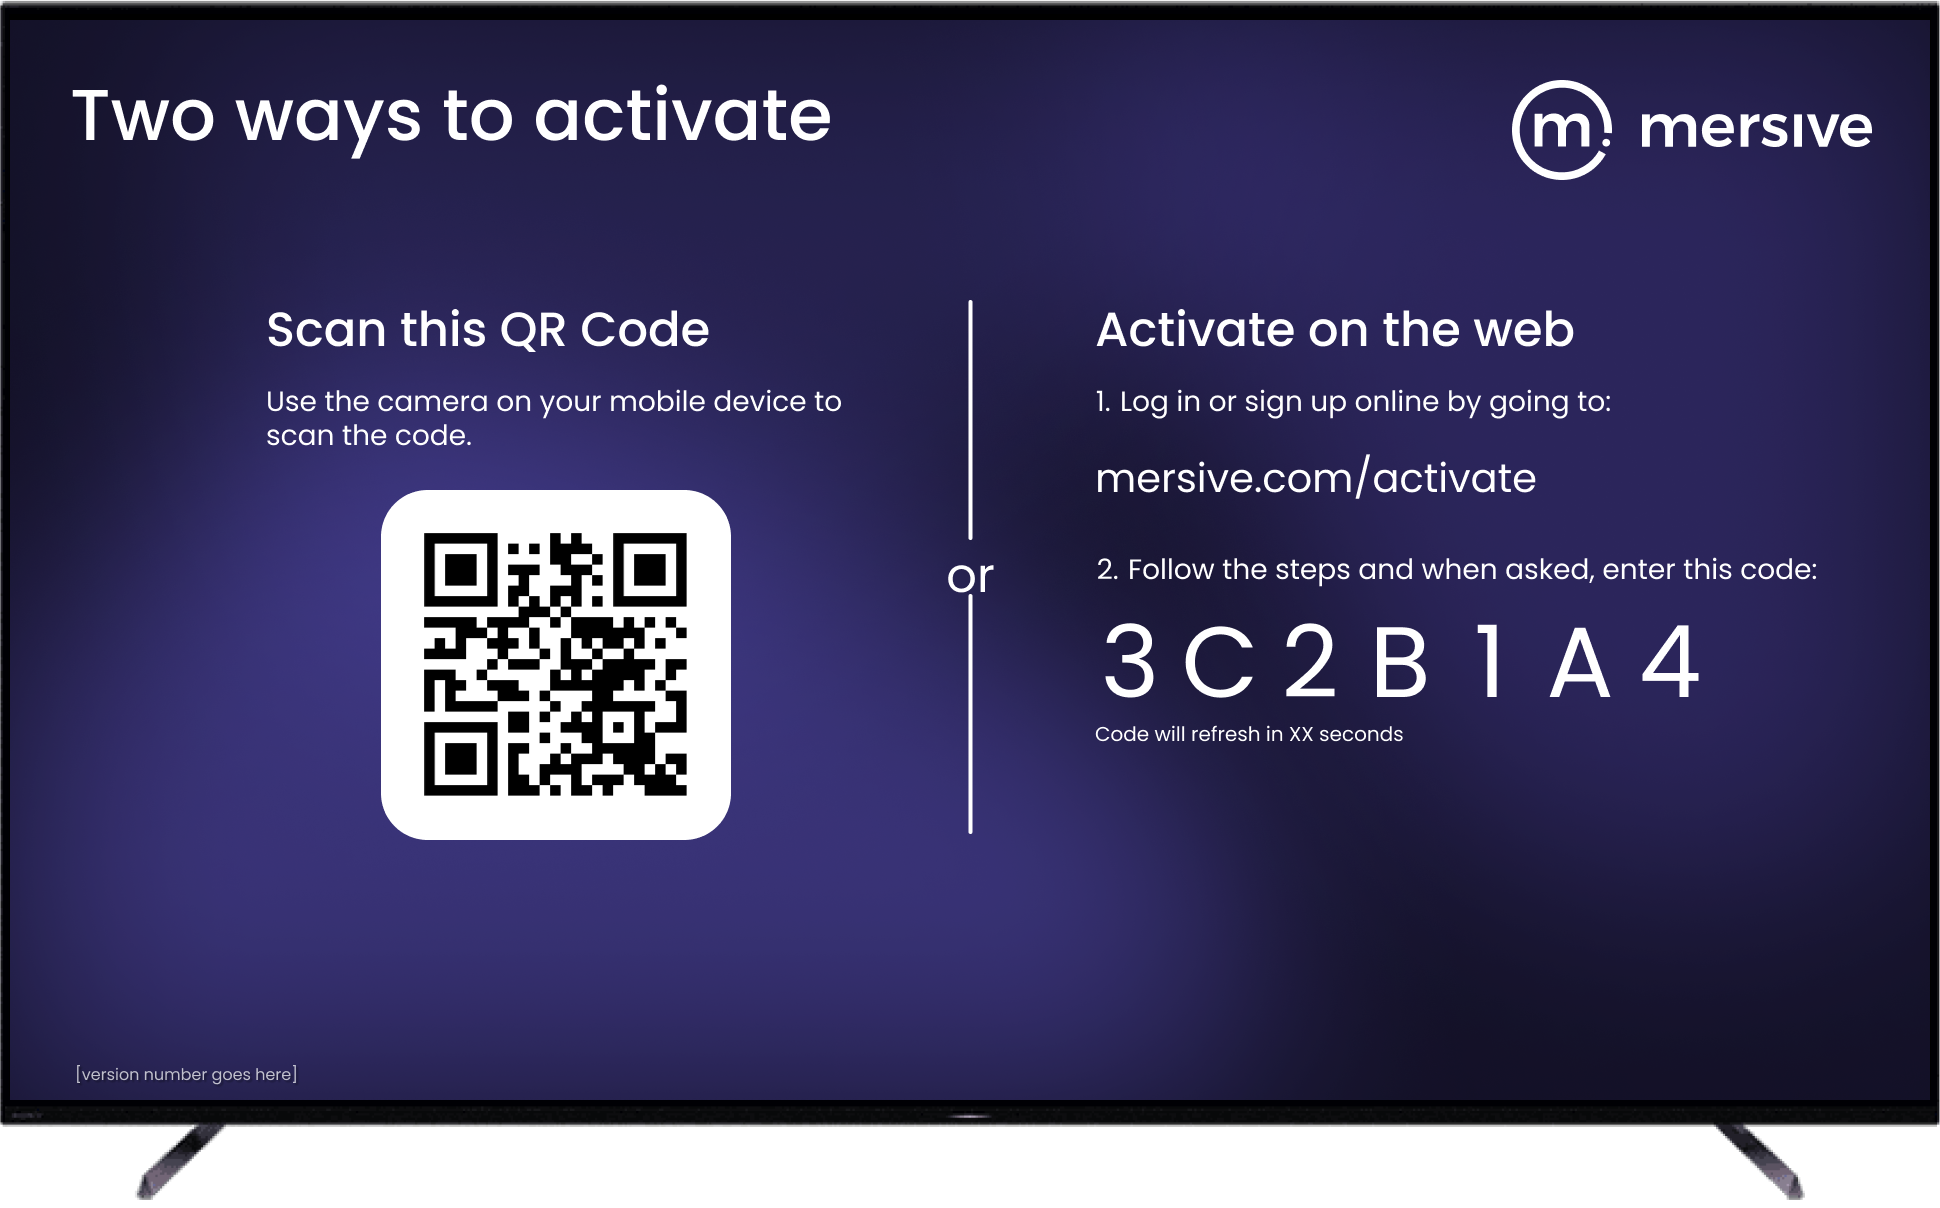
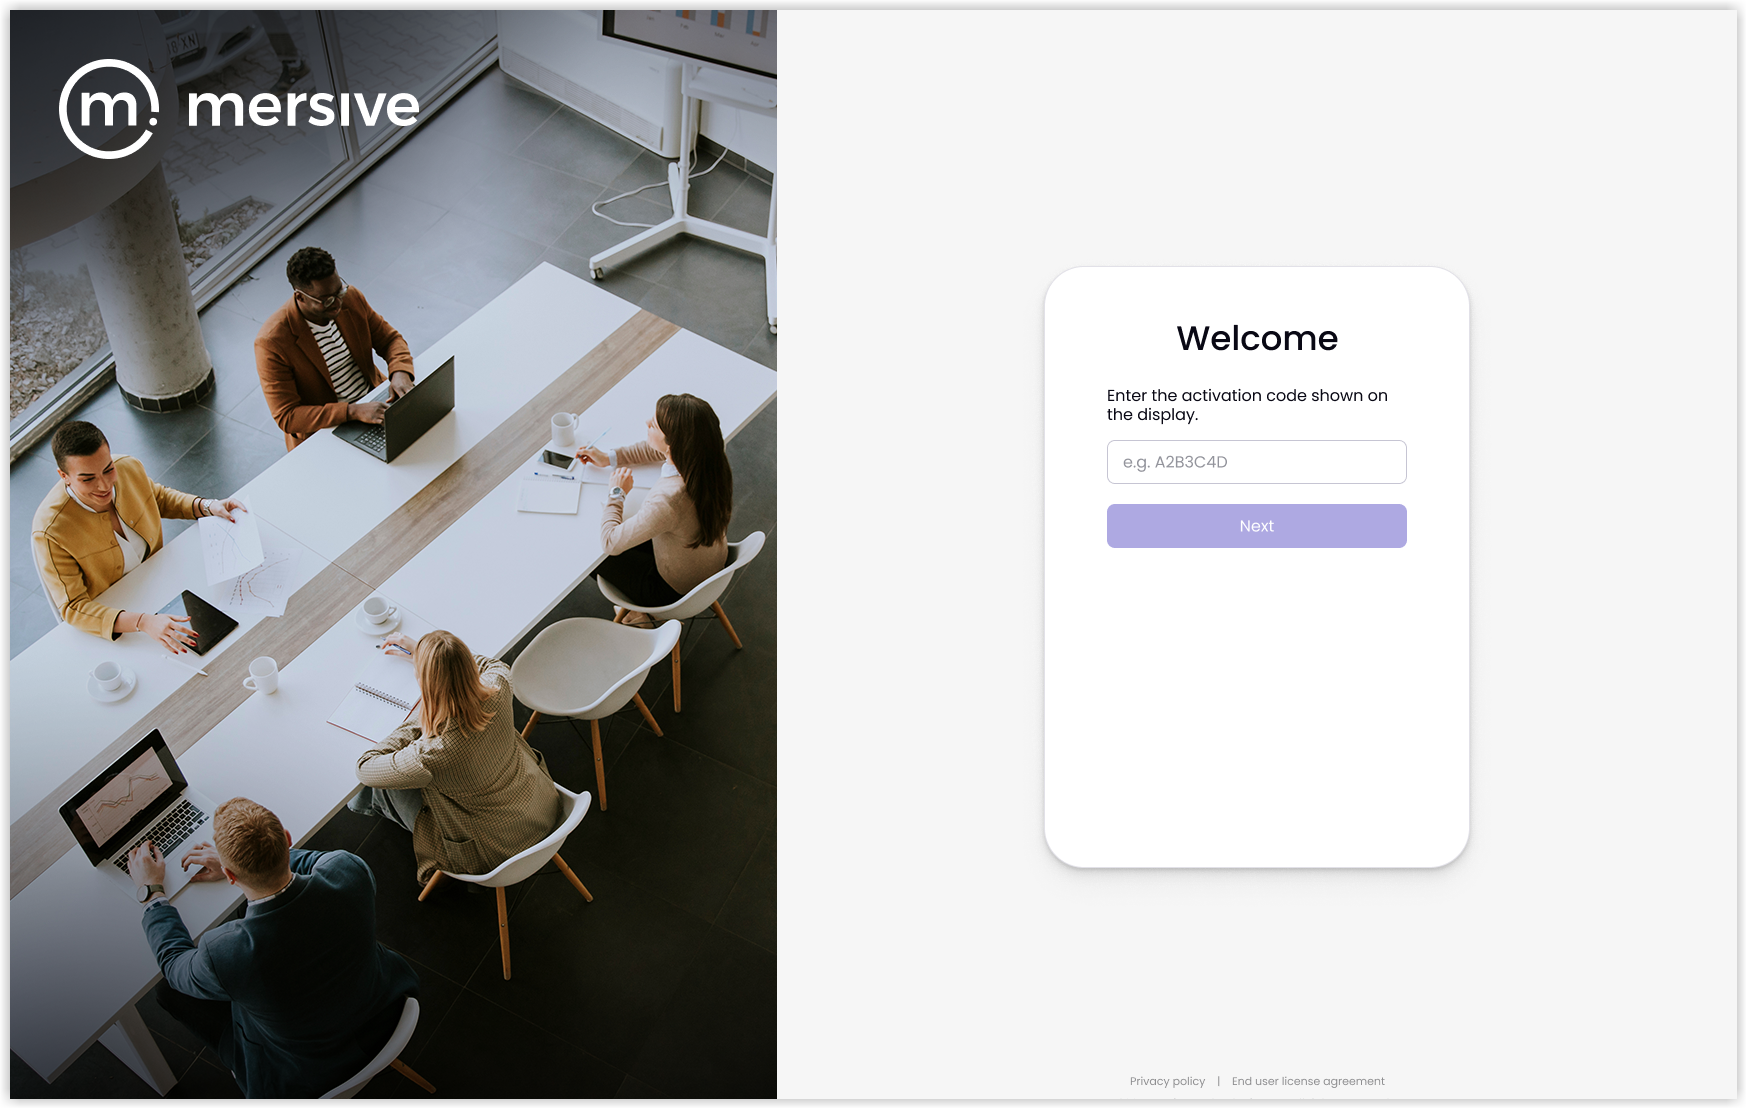
  4. Select Add a device. The Activation screen appears.

  5. Enter the Activation Code from the device. Select Next.

    Activation_05.png
  6. Continue through the activation process.

  7. When the device name appears on the Devices screen in the admin portal, the process is complete.

Device Customization

Customizing the look-and-feel of devices can be accomplished for each device individually. You can adjust several aspects of device appearance, including:

  • Device name

  • Background images

  • Background color

  • Time display

The Device name identifies the individual device. This name will appear on the display’s Idle screen.

Background images display on the Idle screen. Adding custom images and even branded images that represent your business or organization will help bring the displays in line with your corporate image. You can upload custom background images in JPG, PNG, or TIF formats. Files should be no larger than 10MB, and there is a limit of 10 image files at a time. For best coverage of a typical horizontal display layout, a 16:9 image ratio with a resolution of 1920x1080 pixels is recommended. Note: Darker images are recommended for better contrast with on-screen text.

Background color is a solid color that will fill in the gaps around a background image or content windows that do not cover the entire screen area.

The Time display shows the system time on the Idle screen. You have the option of showing a clock with either a12-hour format, a 24-hour format, or no clock at all on the Idle screen.

How to Customize a Device

To customize the look-and-feel of a device, take the following steps:

  1. On your laptop, open a web browser and go to app.mersive.com/admin.

  2. Select your Organization. The list of devices attached to this organization appears.

    Device_Custom_1.png
  3. Select the Device Name link from the Name list. The Settings screen appears.

    Device_Custom_2.png
  4. To change the Device Name, select the Pencil icon (image1.png) next to the name and edit it.

    1. To save the new name, select the Checkmark (image2.png).

    2. To keep the old name, select the X.

  5. To change the device appearance, click Customize background. The Background Images popup appears.

    Device_Custom_3a.png
  6. To set Background Images:

    1. To add new images, drag-and-drop images on the Upload zone. Selecting the Upload zone will open a browser window so you can search for image files.

    2. To select an image for display, click the Circle (image4.png) in the top left corner of the image icon to add a checkmark. Only images with a checkmark will display. Note: If you don’t want any images on the Idle screen, de-select all the images. The Background Color will appear on the Idle screen instead.

    3. To delete an image, click the Trash Can (image7.png)in the top right corner of the image icon.

    4. To change the image display order, drag-and-drop the image icons.

    5. Select a time interval for each image to display (30, 60, or 90 seconds) from the Rotation dropdown list. If only one image is selected, this has no effect.

    6. Select a style for image transition (Push, Dissolve, or None) from the Style dropdown list. If only one image is selected, this has no effect. Note: Push transition does not work on Android TVs or Chromecast devices due to Android OS limitations.

  7. To set a Background Color, use one of these tools:

    • Eyedropper tool (image6.png)

    • Palette tool (image7.png)

    • Color Slider bar

    • Hexadecimal, RGB, or HSL color code fields

  8. When you are finished setting background images and color, click Done.

  9. For the Clock display, select Hide under Display Options to turn off the clock display. The clock is shown by default. Select 12 or 24 to choose between a 12-hour clock or a 24-hour clock.

    Device_Custom_5a.png
  10. To revert to the device’s default settings, select Revert (image8.png).

  11. Click Apply to save the changes.

    Device_Custom_2.png

Deleting Devices

When you remove a device from service, such as when you delete the Smart app from a smart TV or streaming device, the device will still be present in the admin portal. If the device had been activated previously, it will now show an Offline status. So, you will want to delete the device from the admin portal as well. As devices are attached to organizations, you will need to log into the organization that has that device on its list. Device settings and customizations are lost when a device is deleted from an organization in the admin portal.

If you use the admin portal to delete a device that does not have a plan, the device is removed from the list and plans are not affected. But deleting a device with an active plan adds the plan back into the organization’s pool of plans, which means it can be assigned to another device within that organization. Note: Assigning a plan to another device does not change or reset the plan’s expiration date.

How to Delete a Device from an Organization

To delete a device from an organization, take the following steps:

  1. On your laptop, open a web browser and go to app.mersive.com/admin.

  2. Select your Organization. The list of devices attached to this organization appears.

  3. For multiple devices, select the checkbox next to the device name and then select Delete from the bar at the bottom of the screen. Note: To select all devices, click the topmost checkbox.

    Org_01.png
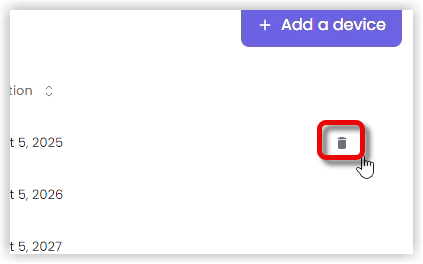
  4. For an individual device, highlight the row of the device and select the Trash Can icon that appears on the right side of the row.

    Device_Delete_2.png
  5. A confirmation screen appears. Select Delete.

  6. The device has been deleted when the name no longer appears on the Devices list.