Configure SSO in Solstice Cloud
Administrators may request access to configure SSO (single sign-on) in Solstice Cloud and their chosen identity provider (IdP). This allows users to log in to Solstice Cloud management using their existing SSO credentials. Okta and Microsoft Azure AD are currently supported as identity providers. SSO configuration requires both entering information from Solstice Cloud into the IdP configuration and entering information from the IdP into Solstice Cloud, and it should be coordinated with your organization's Okta or Azure administrator.
Use the directions below to connect your Solstice Cloud organization with an SSO identity provider. See Manage Users and Roles for Solstice Cloud SSO user configuration information.
Configure Solstice Cloud for SSO with Okta or Azure
Single sign-on (SSO) configuration requires both entering information from Solstice Cloud into the identity provider (IdP) configuration and entering information from the IdP into Solstice Cloud. The Solstice Cloud SSO setup page is accessible only to Admin-level Solstice Cloud users. An IdP administrator for your organization needs to create a new application integration for Solstice Cloud in Okta or Microsoft Azure and assign each Solstice Cloud user to the new Solstice Cloud app.
Log in to Solstice Cloud with an Admin account.
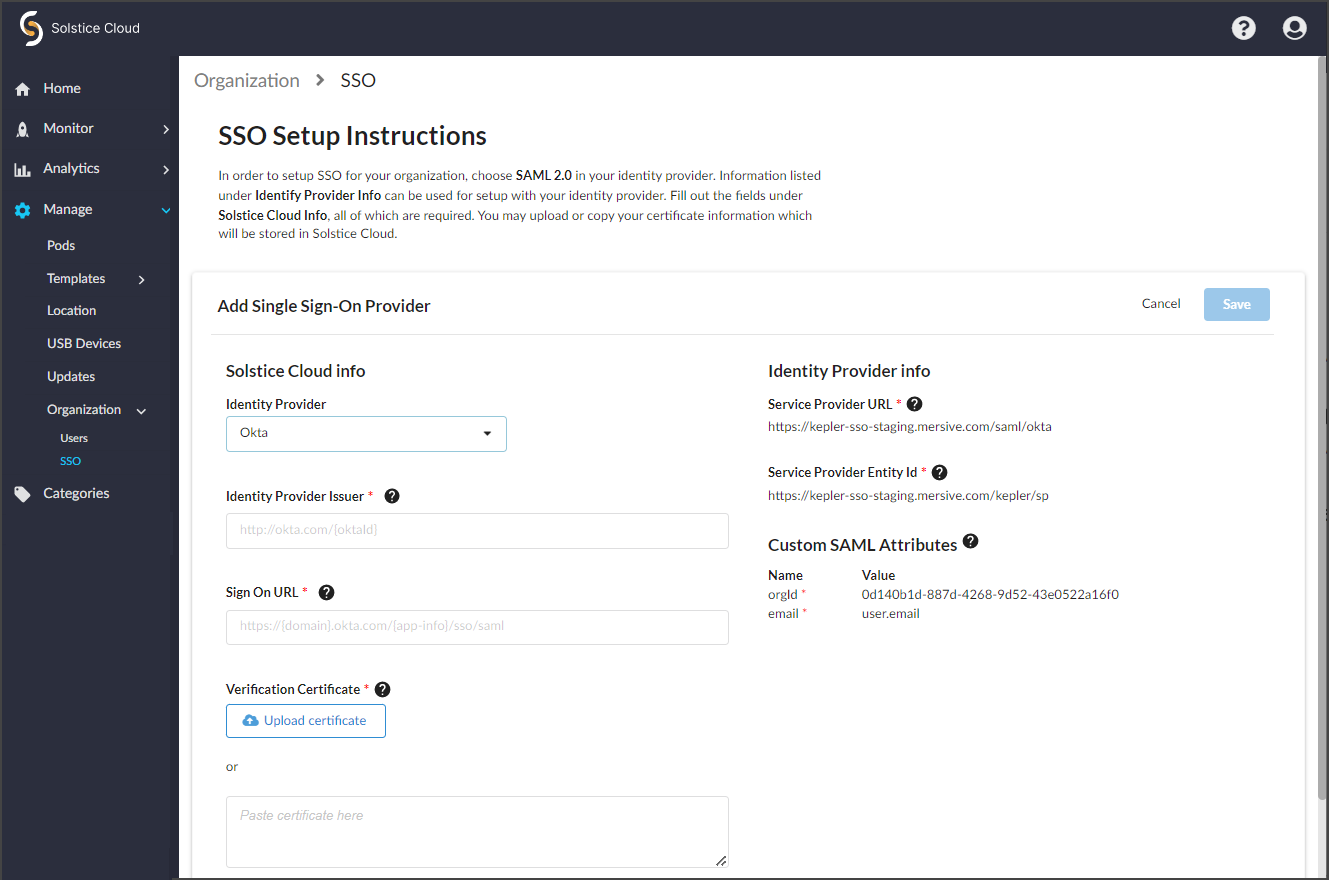
Use the left navbar to go to Manage > Organization > SSO.
Select the Identity Provider used by your organization, either Azure or Okta.
Selecting an Identity Provider populates the Service Provider URL on the right side of the panel.
Use the Identity Provider info on the right side of the Solstice Cloud configuration panel to create an (enterprise) application integration for Solstice Cloud in your identity provider as follows:
Select SAML 2.0 as the authentication method.
Copy and paste the Service Provider URL value into the configuration for the new application SAML integration:
Okta – Single sign-on URL
Azure – Reply URL
Also in the SAML settings for the new application, enter the Service Provider Entity Id:
Okta – Audience URI (SP Entity ID)
Azure – Identifier (Entity ID)
Using the values listed on the Solstice Cloud SSO Setup panel, define the Custom SAML Attributes for the new application:
Okta – Attribute Statements
Azure – Attributes and Claims
Enter the Custom SAML Attributes into your IdP as follows:
Create a new attribute.
Enter the listed attribute Name as the new attribute name.
Enter the attribute Value into the value field (called Source attribute in Azure).
The orgId attribute value is specific to Solstice Cloud and should always be copied and pasted.
Microsoft Azure may require double quotes around this value.
The email attribute value should be mapped to the IdP value that holds SSO users' email addresses. This is usually user.mail, but can be different depending on your SSO identity provider configuration.
Tip
Copying and pasting all values from the Solstice Cloud SSO Setup page is strongly recommended to ensure each value is transferred exactly as listed. For example, the Custom SAML Attribute orgId must contain a capital I.
Finish the application integration setup to have your identity provider generate a SAML sign-on URL and signing certificate.
Now you can enter the SAML setup information generated by the new Solstice Cloud application integration in your IdP into the boxes under Solstice Cloud info on the left side of the SSO Setup panel.
Locate the SAML setup information associated with the Solstice Cloud application you just configured in your identity provider:
Okta – view the SAML setup instructions
Azure – in SSO dev test information
Enter the sign-on URL from your identity provider into the Sign On URL field:
Okta – Identity Provider Single Sign-On URL
Azure – Login URL
Enter the identity provider identifier or issuer on the Solstice Cloud SSO Setup panel:
Okta – enter the Identity Provider Issuer value into the Identity Provider Issuer field
Azure – enter the Azure ID Identifier value into the Azure ID Identifier field
Copy or download the X.509 certificate from your identity provider:
Okta – appears with the two values above in SAML setup instructions
Azure – download the certificate (
.ceror.certfile) from the SAML Certificates section
Then enter it under Verification Certificate in one of these ways:
Paste the copied certificate into the text entry box.
Click Upload Certificate and select the file you downloaded from your IdP.
When the Solstice Cloud info on the left of the setup panel is complete, click Save to store the SSO configuration for your Solstice Cloud organization.
Be sure to also assign users defined in your identity provider to the application you just configured. If a user is not assigned to the Solstice Cloud application in Okta or Azure, they can not log in with SSO to Solstice Cloud, regardless of their Solstice Cloud user configuration.
After users are assigned for SSO access to Solstice Cloud in your identity provider, they can log in to Solstice Cloud using SSO authentication. See below for more about logging in to Solstice Cloud with SSO.
Solstice Cloud SSO Login Flow
After you configure Solstice Cloud and your SSO identity provider (Okta or Microsoft Azure) to connect to one another, users assigned to the Solstice Cloud application in the identity provider can log in using SSO.
First, the Solstice Cloud login page asks for the user's email address to determine if that user is configured to log in with a password, SSO, or either.
After the user has entered their email address and clicked Log In, there are a number of login scenarios based on their account configuration in Solstice Cloud.
If an SSO identity provider is not successfully configured for a user's associated Solstice Cloud organization:
Any user logging in is only prompted for a Solstice Cloud password.
If an SSO identity provider is successfully configured for a user's associated Solstice Cloud organization:
A user whose Solstice Cloud account is set to SSO Only is authenticated directly with the configured SSO identity provider.
A user not set to SSO Only has the choice to log in with a configured Solstice Cloud password or log in with SSO.
A user whose email address is associated with the Solstice Cloud application in the identity provider but has no corresponding account in Solstice Cloud is logged in to Solstice Cloud with Viewer-level access.
A user who has is not assigned to the Solstice Cloud app in the configured SSO identity provider sees a login error if they try to log in with SSO.