Calendaring and Integrations
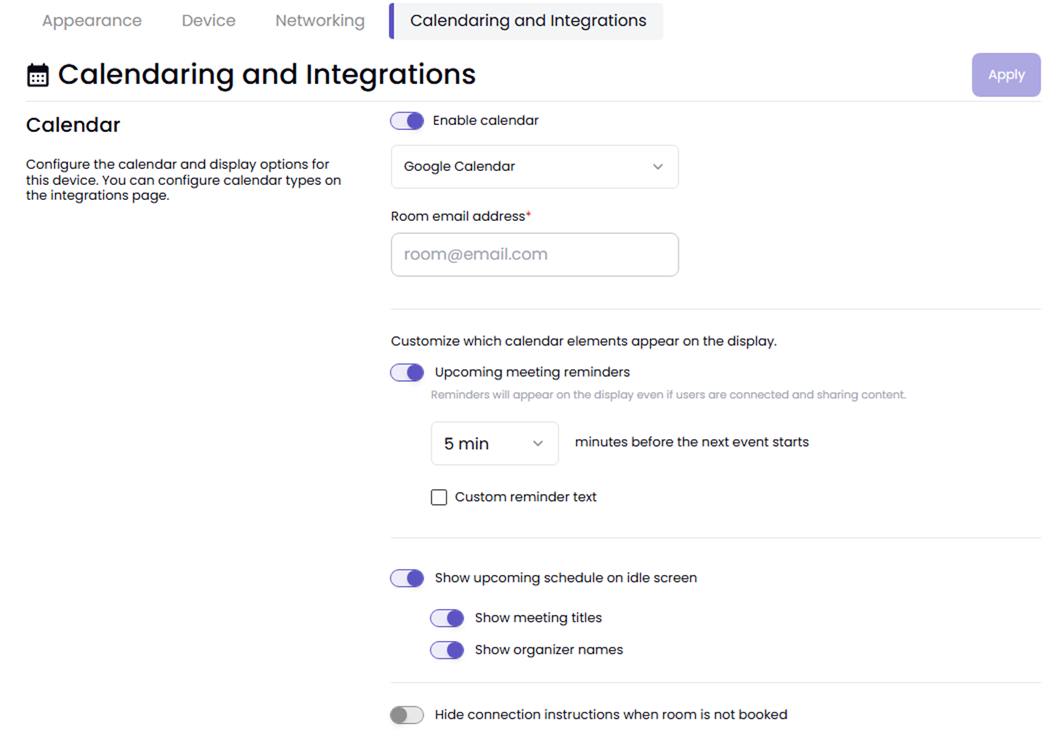
In the Calendaring and Integrations tab, you can configure the calendar and display options for this device. You can configure calendar types on the Integrations page.
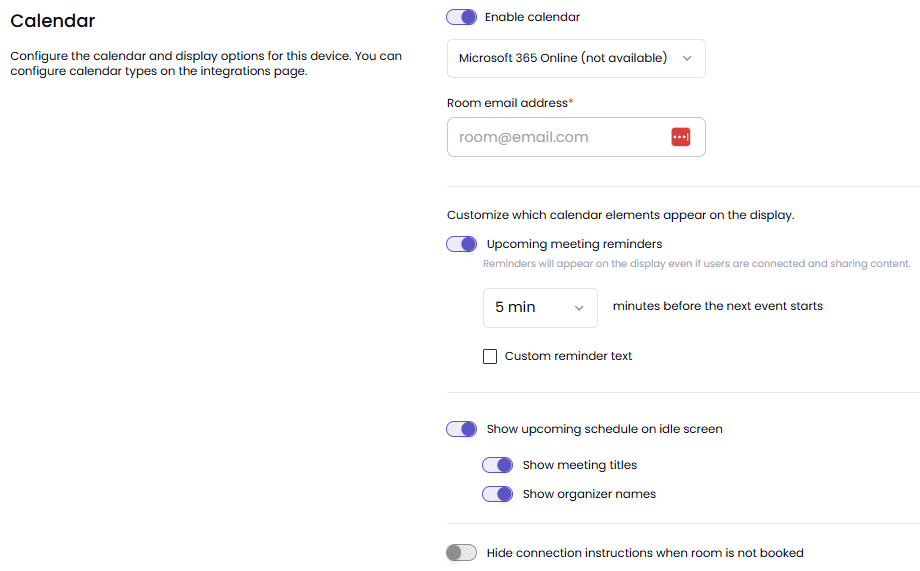
When Enable calendar is on, there are several customizations available:
Calendar Type
Microsoft 365 Online
You will need to add your room email address.
3rd Party Calendar
Customize which calendar elements appear on the display
Set meeting reminders
Decide to show upcoming schedule on the idle screen
Hide connection instructions when the room is not booked
Microsoft Teams Identity Join
To enable a Mersive Pod to join Microsoft Teams meetings as an authenticated, named participant, your organization must complete a one-time setup in your Microsoft 365 and Azure environment.
During setup, your IT administrator will:
Either create a dedicated Microsoft Teams room or equipment resource account if the Mersive Pod will be shared, or assign the Mersive Pod to a dedicated user account.
Assign a Teams Room Basic license to the resource account.
Create and manage the Azure Communications Service resource used for Teams meeting participation and billing.
Grant the Mersive Teams Connector permission to use that resource on behalf of your organization.
Important
The Mersive Teams Connector is a managed Mersive application. Your IT administrator only needs to configure the required resources and permissions within your organization’s tenant.
Requirements
All setup steps are required. No fallback or alternative connection method exists. If any required component is missing or incorrectly configured:
The Mersive Pod cannot join Microsoft Teams meetings.
Join requests will be rejected immediately.
A specific error message will be displayed to help identify and resolve the issue.
For troubleshooting guidance, refer to the Troubleshooting section later in this document.
Before You Begin
Ensure the following requirements are in place before starting the setup process:
A valid Microsoft 365 or Microsoft Entra ID (work or school) tenant.
Personal Microsoft accounts are not supported.
One of the following administrative roles in your tenant to complete the Azure and application-authorization steps during setup:
Global Administrator
Application Administrator
Cloud Application Administrator
These permissions are required to complete the Azure and application-authorization steps during setup.
An eligible Microsoft Teams license assigned to the room account used by the Mersive Pod. Supported licenses include:
Note
Consumer subscriptions, such as Microsoft 365 Family, are not supported.
Microsoft 365 Business Basic
For Resource Accounts:
Microsoft Teams Room Basic
Microsoft Teams Room Pro
For User Accounts:
Microsoft 365 Business Basic, Standard, or Premium
Microsoft 365 E3 or E5
Other Teams-enabled Microsoft 365 plans
Note
Consumer subscriptions, such as Microsoft 365 Family, are not supported.
Having these prerequisites in place before you begin will help ensure a smooth setup experience and prevent authentication or meeting-join issues later.
Get Started
Create or Use an Existing Room Resource or User Account
Create or use an existing dedicated room or equipment resource account that the shared Mersive Pod will use when joining meetings. Create or use an existing user account that the assigned Mersive Pod will use when joining meetings.
Sign in to the Microsoft 365 Admin Center: admin.microsoft.com
Create an account:
For a shared Mersive Pod: Navigate to Resources > Rooms > Equipment > Add resource > Resource Type = Room or Equipment.
For an assigned Mersive Pod: Navigate to Users > Add User
Enter a recognizable name and email address, such as Room 1: room1@yourtenant.onmicrosoft.com.
Assign an eligible Microsoft Teams license to the account.
Create a password and save it securely. You will need these credentials later when connecting the room account.
Complete the setup and verify that the account appears in Active users with the assigned license.
Note
Use a clear naming convention so you can easily identify the account's purpose in your Microsoft 365 environment.
Add the Azure Communication Services Application to Your Tenant
To enable participation in Teams meetings, Microsoft's Azure Communication Services (ACS) application must be available in your tenant.
Install and connect to the Microsoft Graph PowerShell module using an account with the required administrator permissions.
Run the following commands:
### Preparation ###
Set-ExecutionPolicy -ExecutionPolicy RemoteSigned -Scope CurrentUser
Install-Module PowerShellGet-Scope CurrentUser -Force
Install-Module Microsoft.Graph.Applications -Scope CurrentUser -Repository PSGallery -Force

### Connect ###
Connect-MgGraph -Scopes "Application.ReadWrite.All" -NoWelcome

### See if principal is there already ###
Get-MgServicePrincipal -Filter "appId eq '1fd5118e-2576-4263-8130-9503064c837a'"

### IF not, add it ###
New-MgServicePrincipal -AppId
"1fd5118e-2576-4263-8130-9503064c837a"
Sign in with your administrator account when prompted.
Note
This is a one-time setup per Microsoft 365 tenant. If the service principal already exists, an error indicating that it is already present can be safely ignored.
Create an Azure Communication Services Resource
Meeting participation is billed to your organization's Azure subscription, so you must create or designate an Azure Communication Services resource.
Sign in to the Azure Portal.
Search for Communication Services and select Create.
If your organization already has a dedicated ACS resource for this purpose, you can use the existing resource instead.
Specify the resource group, resource name, and region.
Select Review + Create, then Create.
After deployment is complete, open the resource and navigate to Settings > Keys
Copy the full Connection string value.
Important
Copy the entire connection string, including both the endpoint and access key. The value should look similar to:
endpoint=https://your-resource.communication.azure.com/;accesskey=xxxxxxxxxxxxxxxx
Do not copy only the endpoint URL or only the access key.
Configure the Microsoft Teams Integration in the Mersive Portal
In the Mersive portal, navigate to the Microsoft Teams Integration page.
Paste the Azure Communication Services connection string from Step 3 into the ACS Connection String field.
Select Apply.
Select Sign in with Microsoft and sign in with your Microsoft 365 administrator account.
Review and approve the requested permissions.
During this step, your organization grants the Mersive Teams Connector permission to access the Teams functionality required for meeting participation.
Note
You are granting consent to a Mersive-managed application. You don't need to register an application or configure anything in your Microsoft Entra ID tenant.
Once you grant consent, the Sign in with Microsoft option is replaced with a Disconnect option.
Connect the Room Account
After you configure the integration, connect the room account created in Step 1.
On the Microsoft Teams Integration page, locate Conference-Join Room Account.
Select Connect Room Account.
When prompted to sign in, use the room account credentials created in Step 1, not your administrator account.
Review and accept the consent prompt. When authentication is complete, the dialog closes automatically.
The integration page displays the connected room account and provides a Sign Out option.
Depending on your organization’s consent and permissions configuration or use of Microsoft Security Defaults, users will initially be required to have Global Administrator approval for the permissions used by the Mersive Teams Connector app registration. The delegated permissions are:
User.Read
profile
openid
offline_access
Calendars.Read
Teams.ManageCalls
Teams.ManageChats
Optionally, you may grant Admin consent for the Teams Connector app’s permissions after registration, or you may adjust your organization’s “Consent and permissions” configuration. Please ensure the suggested changes fit your organization’s needs.
Example:
Log in to the Microsoft Entra portal.
Select “Enterprise apps” from the left menu pane.
Select “Consent and permissions” from the left menu of the Enterprise apps pane.
a. Select “Allow user consent for apps from verified publishers, for selected permissions”.
Select “Permission classifications” from the left menu of the Consent and permissions pane.
Add the delegated permissions used by the Mersive Teams Connector.
The Mersive Teams Connector uses industry-standard, low-risk permissions. Microsoft Security Defaults do not include the Azure Communication Services Teams permissions, so users will be prompted to request approval, or a Global Administrator must approve the connection. The example instructions provide a path for end users to accept without requiring Global Administrator approval, depending on your organization’s security requirements.
The Mersive Pod is now configured to join Microsoft Teams meetings as the connected room account. In most cases, no additional action is required after setup. Authentication is refreshed automatically in the background, and you only need to reconnect the account if:
Someone manually signs out of the room account.
The room account password changes.
The account remains inactive long enough for its authentication token to expire.
Using Microsoft Teams with Mersive Polaris
Polaris Pro and Microsoft Teams serve different purposes in the room and work together to create a complete collaboration experience.
Microsoft Teams provides a meeting experience that includes calendar integration, meeting controls, audio and video, and remote participation. Polaris Pro provides a shared workspace where participants can display, compare, and collaborate on multiple content sources simultaneously. With Polaris Pro, Teams remains your meeting platform while Polaris creates a collaborative workspace for the content and discussions that happen before, during, and after the call.
How Polaris Pro and Teams Work Together
A Teams meeting often involves more than a single shared screen. Team members may need to compare presentations, spreadsheets, designs, dashboards, and documents from multiple devices simultaneously.
In a Polaris-enabled room:
Microsoft Teams handles the meeting.
Polaris Pro manages the shared workspace.
Users can share multiple content sources simultaneously.
Guests can contribute content without joining the Teams call.
Remote participants can join both the Teams meeting and the Polaris workspace.
This allows teams to compare information side by side instead of constantly switching presenters and interrupting the flow of discussion.
In this section:
Auto-Join Your Next Meeting
When a Microsoft 365 calendar is connected, Polaris Pro displays upcoming Microsoft Teams meetings and provides one-touch joining.
Before You Begin
Ensure:
A Microsoft 365 calendar is connected.
Microsoft Teams integration is configured.
The room account has been authenticated.
The device has internet connectivity.
View the list of upcoming meetings from the room calendar.
Select the meeting you want to join.
Tap Join when the meeting becomes available.
Polaris Pro joins the Microsoft Teams meeting using the configured room account.
If a meeting is not displayed on the calendar:
Select Join by Meeting ID.
Enter the meeting ID.
Enter the meeting passcode, if required.
Select Join.
The room joins the meeting directly through Microsoft Teams.
Meetings Do Not Appear
Verify the room calendar is connected.
Confirm the meeting is scheduled on the associated Microsoft 365 account.
Check internet connectivity.
Unable to Join
Verify that Teams integration is enabled.
Confirm the room account is authenticated.
Check that the meeting ID and passcode are correct.
Room Joins as Itself
Polaris Pro joins Microsoft Teams meetings using a dedicated room account rather than a personal user account.
Each room is assigned a Microsoft Teams room account that is authenticated during setup. When a meeting is launched:
Polaris Pro authenticates using the room account.
Microsoft Teams recognizes the room as a meeting participant.
The room joins using its own identity.
This provides a consistent meeting experience and ensures the room appears as a dedicated meeting participant.
Consistent room identity across meetings.
Simplified meeting joining.
Support for calendar integration and one-touch join.
Centralized management through Microsoft 365 and Teams administration.
Meeting admission and lobby bypass behavior are controlled by Microsoft Teams policies and meeting settings.
Depending on your Microsoft configuration:
Internal meetings may allow the room to bypass the lobby automatically.
External meetings may require participant admission.
Organizational security policies may influence admission behavior.
Your Tenant, Your Calling
Microsoft Teams functionality remains fully within your Microsoft environment.
When Polaris Pro joins a Teams meeting:
Authentication is performed using your Microsoft room account.
Audio and video services are provided through Microsoft Teams.
Call routing remains within your Microsoft tenant.
Teams policies continue to govern meeting behavior.
Polaris does not replace your Microsoft Teams infrastructure. Instead, it extends the room experience by adding a collaborative workspace around the Teams meeting.
Organizations continue to use their existing Microsoft Teams and Microsoft 365 licensing.
Polaris Pro requires its own licensing and hardware, but Teams meetings continue to use:
Microsoft Teams licensing
Microsoft room account licensing
Microsoft meeting policies
Microsoft identity and authentication services
Meeting traffic follows Microsoft's standard service architecture.
User authentication
Meeting participation
Audio and video traffic
Compliance and security policies
Recording and transcription services
Polaris manages:
Workspace collaboration
Multi-source sharing
Guest sharing
Browser-based workspace access
Device management through Polaris Cloud
Room Joins as Itself
Your Tenant, Your Calling
Set Up Google Calendar
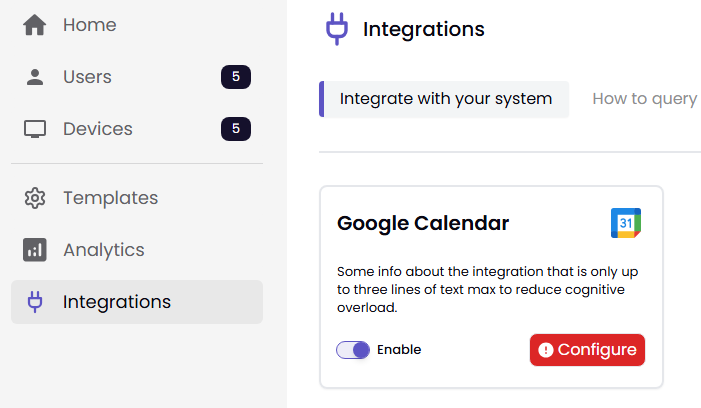
To set up Google Calendar, navigate to Integrations. In the Google Calendar box, toggle the Enable button, then click Configure.
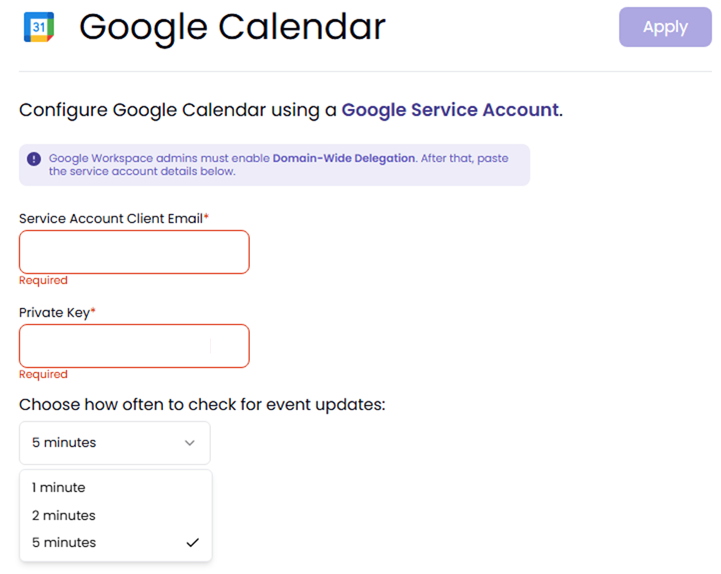
Next, enter the Service Account Client Email and Private Key, then choose how often to check for updates. Click Apply.
Finally, go to the Device tab and click the Device Name. Go to Calendaring and Integrations, toggle the Enable calendar button, then configure the remaining settings. When done, click Apply.