Power Management Template
Power management templates allow you to schedule when a Pod's display monitor turns off after being idle for the specified amount of time. Solstice can do this using one of two methods: suspending the HDMI signal being sent to the display, which allows the display monitors to use their own sleep settings, or by sending an RS-232 command to the display to turn off. The display turns back on if any activity occurs.
Note
If a calendar integration is enabled on the Pod, and a meeting is scheduled, the Pod does not suspend the display. Even if no one has connected to the Pod, and even if a Pod that is configured to detect room occupancy does not detect anyone in the room, the display does not suspend until after the scheduled meeting has ended.

How To
From the Solstice Cloud Home page, in the left sidebar navigation panel, click Templates > Power Management.
Click Create New Power Management Template.
Enter the Template Name. For example, you could name the template by location (London Office) or descriptively (Mountain Theme).
Click Save.
Tip
You can also start by duplicating an existing template and making changes to it. Click on the three dots on the right side of the template you want to start with, and choose Duplicate Template.
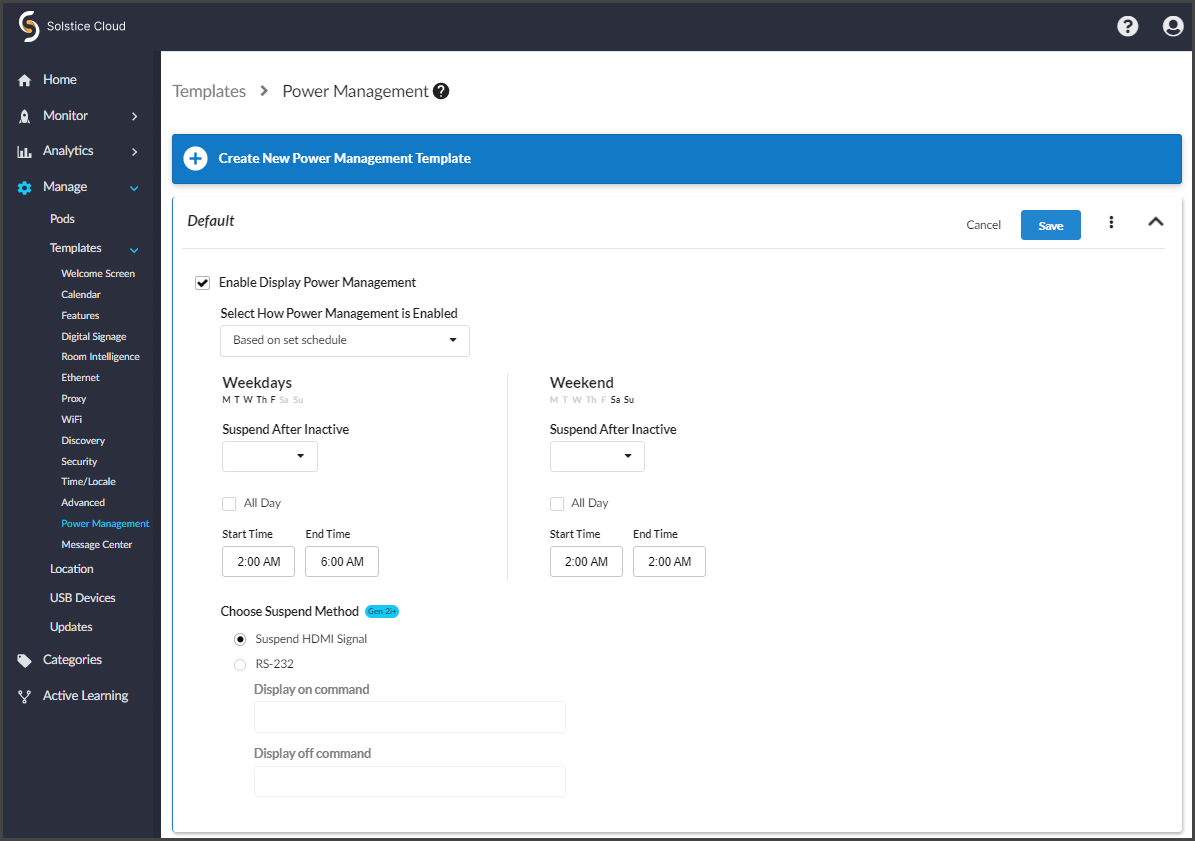
To activate options, on the Power Management template select the Enable Display Power Management checkbox.
From the Select How Power Management is Enabled list, select Based on set schedule.
Note
Notice that there are separate setting for weekdays and weekends, although the same options are available for each. For either weekdays or weekends, use the following steps 1 and 2.
From the Suspend After Inactive list, select the amount of time the Pod is idle before the display is suspended. For example, you can select "10 Minutes" for the Pod to be suspended after 10 minutes of inactivity.
Select the hours during which this display power management setting will be active on Weekdays:
For this setting to be active all day, select the All Day checkbox. Mersive highly recommends only using this option on weekends.
For this setting to only be active during certain hours, deselect the All Day checkbox and enter in a Start Time and End Time. As a note, these fields use a 24-hour clock. Mersive highly recommends only scheduling during hours where no collaboration sessions occur. For example, a corporate office could enter in a Start Time of 19:00 (7:00 pm) and an End Time of 06:00 (6:00 am).
Select the hours during which this display power management setting is active on Weekends.
From the Choose Suspend Method options, select the method to use to signal display monitors to turn off:
Suspend HDMI Signal - The Solstice Pod suspends the HDMI out signal, allowing the display monitors to use their own sleep settings.
RS-232 - The Solstice Pod sends the RS-232 commands you enter to the display monitor to turn it on and off.
If the RS-232 option is selected, enter in the RS-232 codes to turn your display monitor on and off in the corresponding fields that appear below. Solstice uses them to turn the display on or off. ASCII and HEX codes are both supported.
Note
Administrators need to know the specific RS-232 code for the control they are trying to pass. For details on those controls, please consult the user manual for the display.
Click Save.
Occupancy-based display power management allows Solstice to leverage its room occupancy detection capability to automatically sleep or wake the room display when employees enter and exit the meeting room. To enable this capability, you first need to:
Plug a supported USB camera into the Pod on Solstice version 5.1 or later
Ensure occupancy data is enabled for the Pod (Features template)
To enable display power management based on room occupancy:
From the Power Management template, select the Enable Display Power Management checkbox.
From the Select How Power Management is Enabled list, select Based on room occupancy.
From the next list, select the select the amount of time after the room is determined to be unoccupied before the display is suspended.
Warning
Mersive advises against using the Immediate option, as this could trigger the display to turn off if the camera is temporarily blocked. Occupancy is detected every 10 seconds, so there may be a delay before the display reawakens.
From the Choose Suspend Method options, select the method to use to signal display monitors to turn off:
Suspend HDMI Signal - The Solstice Pod suspends the HDMI out signal, allowing the display monitors to use their own sleep settings.
RS-232 - The Solstice Pod sends the RS-232 commands you enter to the display monitor to turn it on and off.
If the RS-232 option was selected, enter in the RS-232 codes to turn your display monitor on and off in the corresponding fields that appear below. Solstice uses them to turn the display on or off. ASCII and HEX codes are both supported.
Note
Administrators need to know the specific RS-232 code for the control they are trying to pass. For details on those controls, please consult the user manual for the display.
Click Save.
Note
Solstice administrators should be aware that the Cloud settings for a Solstice Pod take precedence and overwrite any conflicting settings on the Pod itself.
In the case of a settings mismatch for a Pod between Solstice Cloud and the Pod's own settings, Cloud settings always "win." The only exception is when a settings change in a Cloud template causes Solstice Cloud to be unable to connect to the Pod. In this case, the settings in that template set are rolled back to the last working configuration for that Pod. Pod and template status indicators alert users when this case occurs.
In the left sidebar menu of Solstice Cloud, click Manage > Pods.
The Pod Template Assignments table displays. This table is used to apply templates across your deployment. You can apply a template to multiple Pods at once.
Tip
Filter Solstice Pods in your deployment by default categories or categories you have created to apply templates efficiently to similar Pods. Filters allow you to apply templates by criteria such as location or campus, depending on the categories you have created and assigned to Pods.
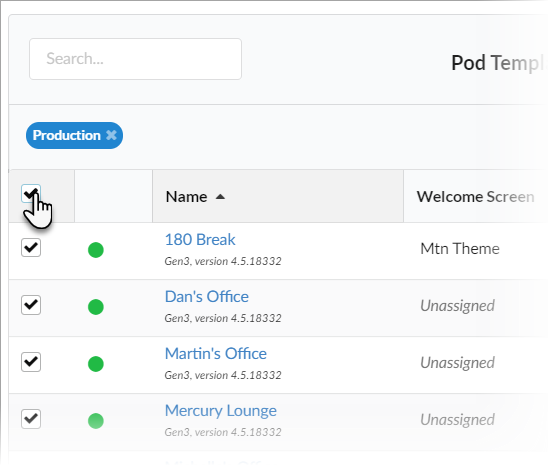
Select the Pods you want to apply the template to. You can select each Pod's checkbox individually, or select the checkbox in the header row of the table to select all Pods showing in the table.

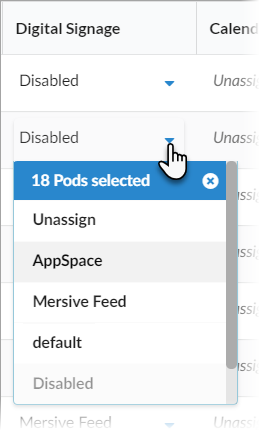
For each template you want to apply, go to the corresponding template type column (e.g., Welcome Screen). You can view different groups of templates by selecting a template category in the upper right corner of the table.

Select the template with the desired configuration from the list in the appropriate column for one of the selected Pods. This applies the template to all the selected Pods in the table.

Click Confirm when to confirm applying the selected template to all selected Pods.
As changes are being applied, the pending changes
 icon appears next to the template(s) being applied. After the changes are applied, the Pod's normal status resumes.
If a Pod is offline, any changes made are applied when the Pod comes back online.
If a settings change in a Cloud template causes Solstice Cloud to be unable to connect to the Pod, the Pod's settings for that template is rolled back to their previous configuration. A failure icon
 shows that the template could not be applied.
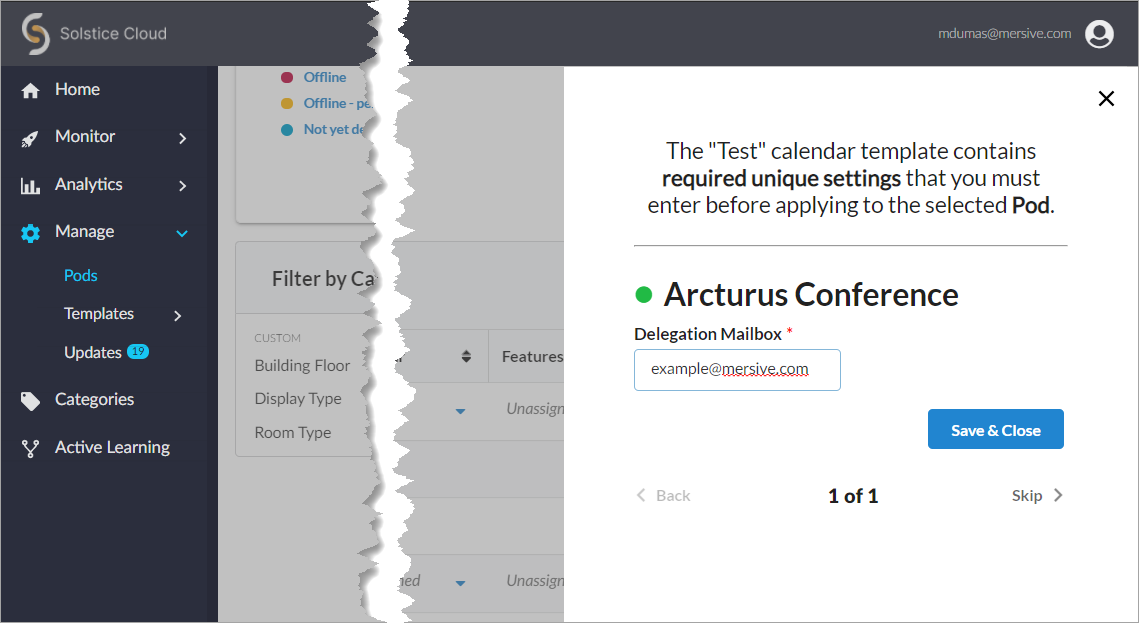
If a template you applied has any unique-to-Pod settings that need to be applied each Pod individually, a pop-up pane appears prompting you to enter the needed information for each affected Pod. After you complete all of the settings screens, click Save & Close.

Tip
Solstice checks the settings selected for a Pod in Solstice Cloud management against the settings on the Pod itself approximately once an hour, as well as upon Pod reboot.