Advanced Template
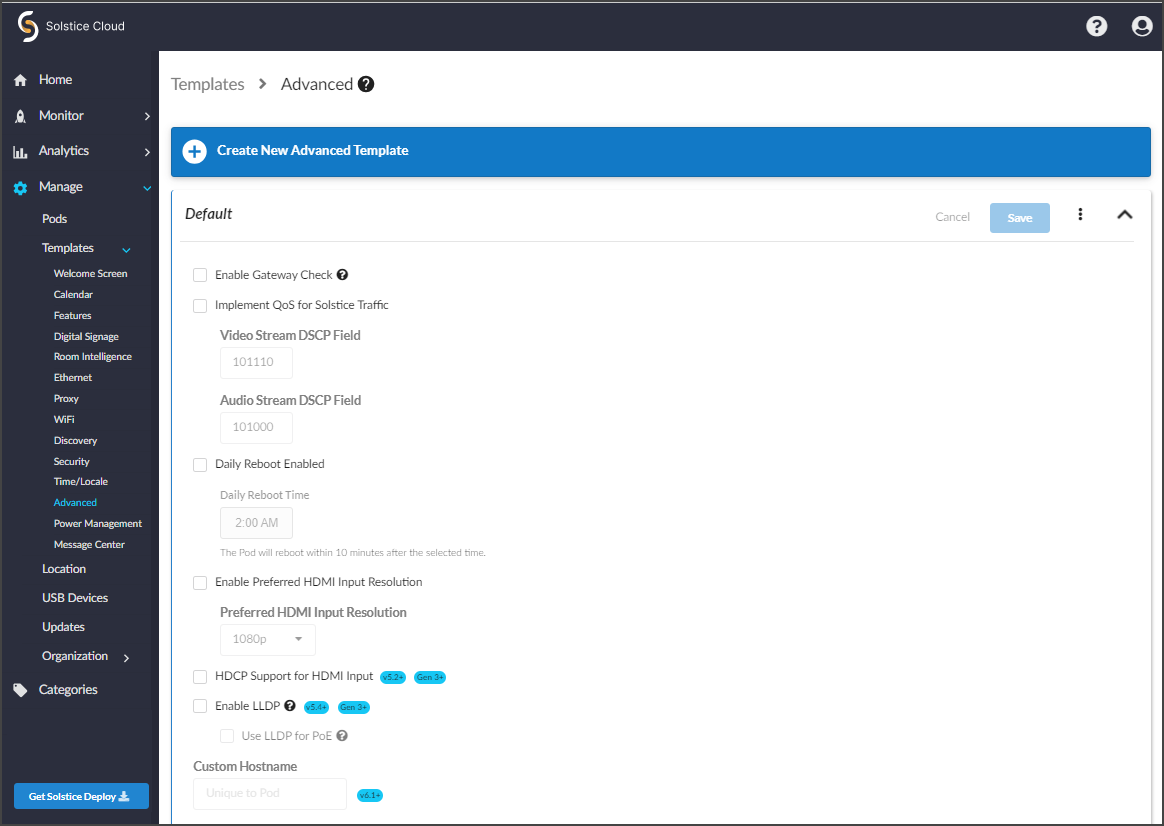
The Advanced Template offers an advanced suite of settings for Solstice Pods in your deployment. Features include implementing quality of service to help prioritize Solstice traffic on your enterprise network, automatically rebooting Pods to maximize performance, enabling HDCP support to play high resolution video, and using LLDP for PoE power management. Custom hostnames can be set in the Advanced settings for individual Pods.
How To
From the Solstice Cloud Home page, in the left sidebar navigation panel, click Manage > Templates > Advanced.
Click Create New Advanced Template.
Enter the Template Name. For example, name the template by location (London Office) or descriptively (Mountain Theme).
Click Save.
Tip
You can also start by duplicating an existing template and making changes to it. Click on the three dots on the right side of the template you want to start with, and choose Duplicate Template.
Previously, Solstice Pods assigned to a template with this setting enabled would restart networking every ten minutes. However, this feature was deprecated and will be ignored by Pods running Solstice versions 5.3.2 and later.
Mersive recommends all customers disable this feature as soon as is convenient. To disable the Gateway Check:
Uncheck the Enable Gateway Check box.
Click Save.
Quality of service (QoS) packet headers can be enabled to allow Solstice traffic to be differentiated and prioritized on enterprise networks by using the IETF-defined QoS header information. The Solstice Pod does not manage QoS traffic into or out of the Pod. It simply adds QoS tags to the packet headers, which allows routers on the network to better manage heavy network traffic.
Select the Implement QoS for Solstice Traffic checkbox.
In the corresponding fields that appear below, enter the 6-digit binary QoS video and audio stream bit settings.
By default, the Video Stream DSCP field is set to 101 110, which is Expedited Forwarding with a precedence value of 46. The Audio Stream DSCP field defaults to 101 000, which is CS5 with a precedence value of 40. Packets with a lower precedence value might be dropped by QoS-enabled routers on the network in favor of higher precedence packets. See commonly used DSCP values described in RFC 2475 by the IETF.
Click Save.
In Solstice 5.5, QoS tagging was added for Solstice video conferencing audio and video traffic between the Solstice Pod and the Mersive Solstice app on the ports listed below. Port numbers are based on the Solstice Base Port number set in Solstice Dashboard. If the base port number is set to 53100 (default), the QoS bit settings defined above are added to audio and video traffic for the following ports:
macOS audio microphone port (53207 or custom base port + 100 + 7)
Windows video port (53210 or custom base port + 100 + 10)
Windows audio microphone port (53212 or custom base port + 100 + 12)
Windows audio microphone RTCP port (53213 or custom base port + 100 + 13)
Note
Camera and speaker data streams for Solstice Conference drivers on macOS and the speaker data stream for Solstice Conference drivers on Windows are not currently QoS tagged. See Network RequirementsNetwork Requirements for more about network ports used by Solstice.
Windows allows you to put QoS information into the packets being sent from the Solstice client by creating a local group policy on your computer.
On your Windows computer, press Windows logo key + R.
In the Local Group Policy Editor navigate to Local Computer Policy | Computer Configuration | Policies | Windows Settings | Policy-based QoS.
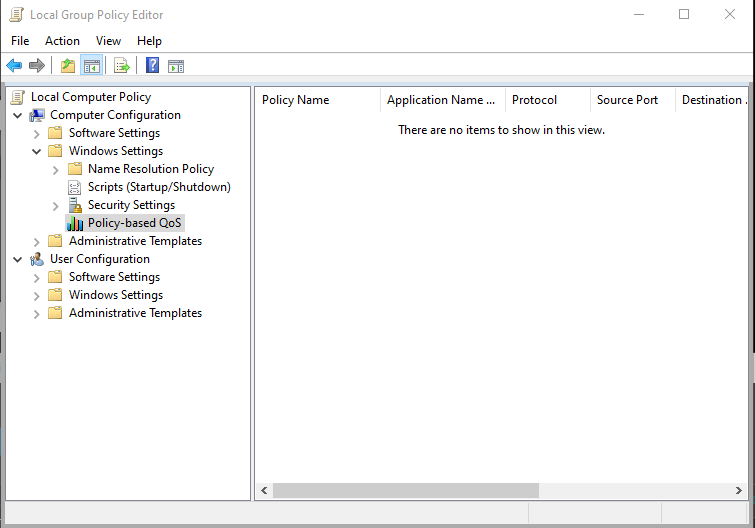
Right-click Policy-based QoS and select Create new policy.
On the first page of the Create a QoS policy wizard, enter a name for this policy in the Policy name field.
With the Specify DSCP Value check box selected, enter a value of 46.
The precedence value of 46 corresponds to "Expedited Forwarding." However, you can enter other values defined in the DSCP Pool 1 Codepoints defined by the IETF.
Click Next.
Under The QoS policy applies to label, select Only applications with this executable name and enter SolsticeClient.exe.
Click Next.
On the source and destination IP addresses page, click Next.
On the protocol and port numbers page, choose TCP and UDP from the list and then click Finish.
Packets from the Solstice client are now tagged with QoS headers with a precedence value of 46.
Enable and schedule daily Pod software reboots to refresh the Pod’s memory usage and maximize system performance. If users are connected and sharing content to a Pod at the scheduled reboot time, that Pod's reboot is skipped until the next scheduled reboot time.
Select Daily Reboot Enabled to turn on and schedule daily reboots.
In the Daily Reboot Time field, enter in the time you want the Pods to restart each day.
Note
Daily reboots will take place within 10 minutes after the selected time.
Click Save.
On Solstice Gen3 Pods, the HDMI input is HDCP-compliant, which means a laptop or other device can connect to the HDMI-In port and pass digitally protected content through the Pod. HDCP support is disabled by default.
Note
This feature is available for all Gen3 Pods (serial number MPOD8000A2xxxxxx or higher) on Solstice 5.2 or later.
To enable HDCP support on Pods assigned to this template, select the HDCP Support for HDMI Input checkbox.
Click Save.
The HDMI-in port on Gen3 Solstice Pods can be configured for a preferred input resolution, up to 1080p.
Important
Do not change the Preferred HDMI Input Resolution for a Solstice Pod while there is an active HDMI-In connection to the Pod. This can disable the HDMI-In port in some cases.
Select Enable Preferred HDMI Input Resolution to configure the HDMI input resolution for Pods assigned to this template.
Select your Preferred HDMI Input Resolution for HDMI input, 1080p (default), 720p, or VGA.
Click Save to apply the new HDMI input resolution setting to Pods.
Note
The HDMI-in port on Pods affected by this change must be reset for the new resolution preference to take effect. This can be done by physically disconnecting and reconnecting the HDMI cable from the HDMI-in port, turning the HDMI input port off and on again using the OpenControl API,OpenControl API, or rebooting the Pod (Manage > Pods > Pod Actions).
This setting enables LLDP support in Solstice versions 5.4 and later, which allows a PoE switch and a Gen3 Solstice Pod to signal and negotiate available power.
Check Enable LLDP to turn on information reporting from Gen3 Solstice Pods over Link Layer Discovery Protocol.
Check Use LLDP for PoE to enable Gen3 Pods to use LLDP to report and negotiate their Power over Ethernet requirements with a PoE/PoE+ switch.
Important
Only enable this option for Pods that use Power over Ethernet as a sole power supply and when the switch supplying power supports LLDP (Link Layer Discovery Protocol) and LLDP-MED (Media Endpoint Discovery).
Click Save.
Starting in Solstice 6.1, administrators can change the hostname by which an individual Solstice Pod identifies itself to the local network, including in LLDP reporting (see above) and for security certificates, in Solstice Cloud.
Set a custom hostname by going to the Manage > Pods table, selecting the Pod's name, and scrolling down to the Advanced settings. Enter a Custom Hostname for that Pod and use the associated SAVE button to apply the change. Do not click Save as Unassigned or Save as New Template at the top of the settings section since this will remove the previously assigned template for that Pod.
Note
Hostnames for Solstice Pods can be up to 32 characters long. They must start with a letter, end with a number or letter, and can contain uppercase and lowercase English-language characters, as well as numbers and dashes.
Learn more about configuring individual Pod settings in Solstice Cloud.
Note
Solstice administrators should be aware that the Cloud settings for a Solstice Pod take precedence and overwrite any conflicting settings on the Pod itself.
In the case of a settings mismatch for a Pod between Solstice Cloud and the Pod's own settings, Cloud settings always "win." The only exception is when a settings change in a Cloud template causes Solstice Cloud to be unable to connect to the Pod. In this case, the settings in that template set are rolled back to the last working configuration for that Pod. Pod and template status indicators alert users when this case occurs.
In the left sidebar menu of Solstice Cloud, click Manage > Pods.
The Pod Template Assignments table displays. This table is used to apply templates across your deployment. You can apply a template to multiple Pods at once.
Tip
Filter Solstice Pods in your deployment by default categories or categories you have created to apply templates efficiently to similar Pods. Filters allow you to apply templates by criteria such as location or campus, depending on the categories you have created and assigned to Pods.
Select the Pods you want to apply the template to. You can select each Pod's checkbox individually, or select the checkbox in the header row of the table to select all Pods showing in the table.
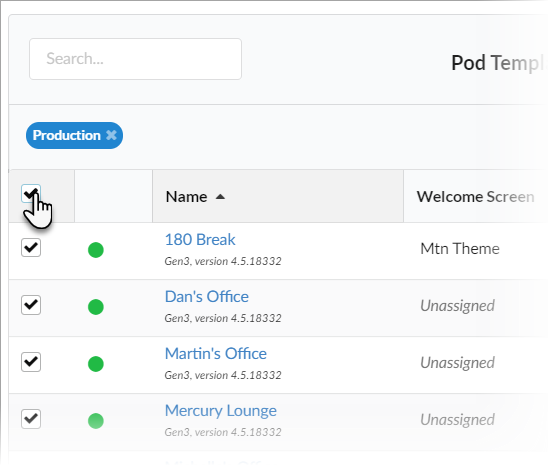
For each template you want to apply, go to the corresponding template type column (e.g., Welcome Screen). You can view different groups of templates by selecting a template category in the upper right corner of the table.

Select the template with the desired configuration from the list in the appropriate column for one of the selected Pods. This applies the template to all the selected Pods in the table.
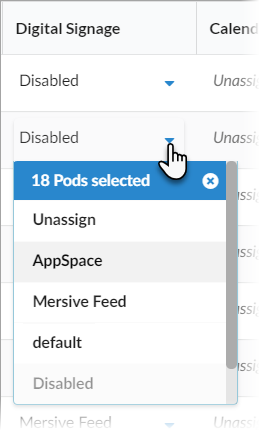
Click Confirm when to confirm applying the selected template to all selected Pods.
As changes are being applied, the pending changes
 icon appears next to the template(s) being applied. After the changes are applied, the Pod's normal status resumes.
If a Pod is offline, any changes made are applied when the Pod comes back online.
If a settings change in a Cloud template causes Solstice Cloud to be unable to connect to the Pod, the Pod's settings for that template is rolled back to their previous configuration. A failure icon
 shows that the template could not be applied.
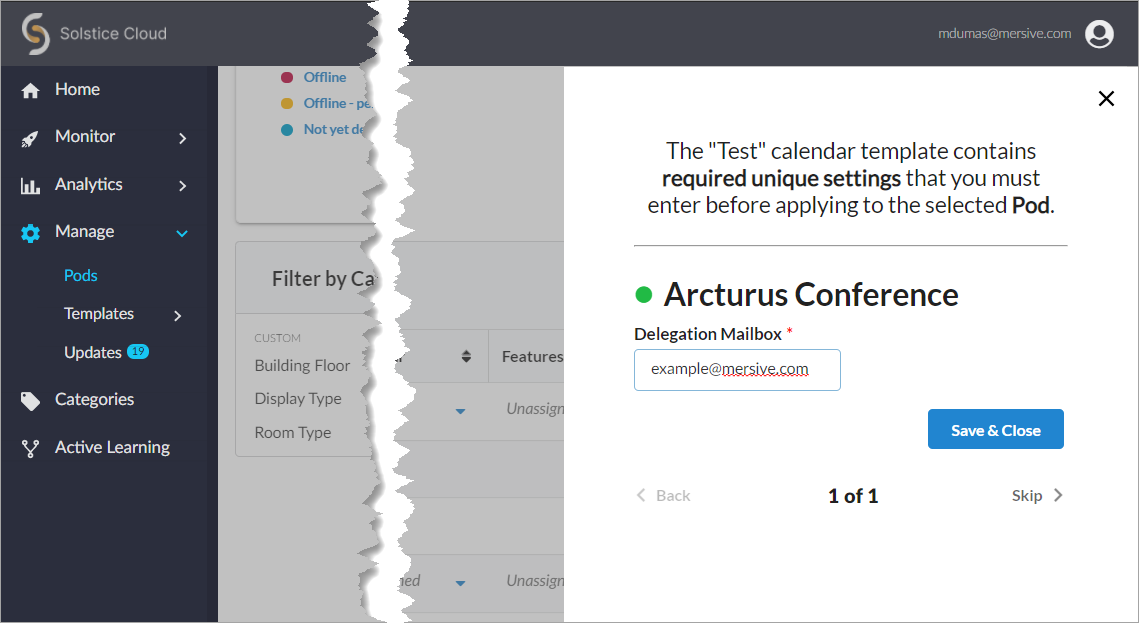
If a template you applied has any unique-to-Pod settings that need to be applied each Pod individually, a pop-up pane appears prompting you to enter the needed information for each affected Pod. After you complete all of the settings screens, click Save & Close.
Tip
Solstice checks the settings selected for a Pod in Solstice Cloud management against the settings on the Pod itself approximately once an hour, as well as upon Pod reboot.