Microsoft 365 Settings for Calendar Integration
Before integrating a Microsoft 365 calendar with modern authentication, you need to do some additional admin setup steps to configure Microsoft 365 authentication. You use Microsoft's Azure Active Directory to configure access for the Pod to communicate with the Microsoft Graph API and obtain the information needed to integrate with Solstice.
Note
These steps must be performed by a user logged into an Microsoft 365 Administrator tenant account. You create and save several pieces of information that you need to enter into Solstice Dashboard.
Note
For the most up to date instructions, refer to Microsoft's documentation to Configure an app to access a web API and Register an app.
Create an App Registration
Go to https://portal.azure.com and log in to your Microsoft 365 administrator account.
Click the menu icon in the upper left corner, and select Azure Active Directory.
In the left sidebar menu, select App Registrations.
From the menu bar in the main window, select New Registration.
In the Name field enter a name.
Under Supported Account Types, choose the Single Tenant option.
Click the blue Register button at the bottom of the window.
In the Essentials section in the main window, copy and save the Application (Client) ID and the Directory (Tenant ID). You enter these values into Solstice Dashboard.
Create a Client Secret for the App Registration
In the left sidebar menu, select Certificates & Secrets.
In the Client Secrets section, select New client secret.
Enter a name or description for the secret (password) and select the expiration. Click Add.
Copy and save the new Secret Value, as you need to enter it into Solstice.
Note
Be sure to copy and save your Secret Value. You cannot retrieve it after leaving this page.
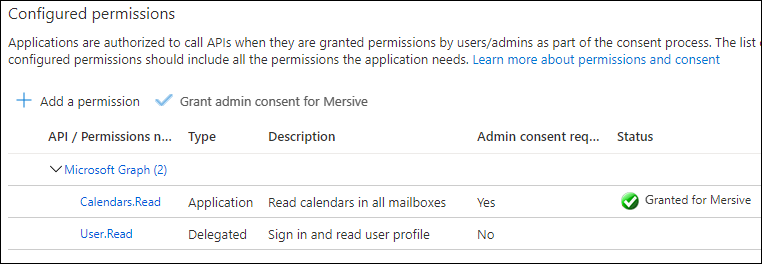
Allow Calendar.Read Access to the Microsoft Graph API
In the left sidebar menu, select API permissions.
In the Configured permissions section, select Add a permission.
In the Microsoft APIs section, select Microsoft Graph.
Click on Application permissions.
Use the Select permissions filter field to find and select Calendars.
Select Calendars.Read from the Calendars menu.
Click Add permissions.
In the Configured permissions section, select Grant admin consent for Mersive.
Approve consent by clicking Yes.
Note
If your organization uses Microsoft Azure AD for authentication, also see Microsoft's Grant admin consent in App registrations topic to allow users to integrate their MS365 calendars with the Mersive Solstice app.
After consent is successfully granted, a green check mark appears in the Configured Permissions table in the Status column of the Calendar.Read row.
Configure Solstice Pod to Display a Microsoft 365 Calendar
Follow the appropriate link below for more information about configuring a Solstice Pod to access a Microsoft 365 account in the Solstice management tool used by your organization.
Related Topic
Google Workspace Settings for Integrating Resource Calendars with Solstice